Hi guys!! I already bought a card in eBay for $400 + $50 for shipping
And I already have a 180w power supply and a 720qm
So Will I need do the same mod from 6970m or I can do another thing more then cut the heat sink and put smaller ones on VRMs? Thanks guys
And it is from clevo with enduro disable
Will I need to do the vbios to?
Regards
-
-
From what I've heard it's a toss up whether it not you need to flash it or not. You can just install the card and try to boot and see what happens. Make sure you setup your usb flash drive to blind flash just in case.
This was the advice given to me. I'll have the same one soon but don't know when I can install it
Sent from my SCH-I535 using Tapatalk 2 -
Parts are staring to arrive. The PSU should be here tomorrow.
![[IMG]](images/storyImages/20121031_134313.jpg)
-
Thanks Cuban !
I have a 5870 dead card so my g73 turns on with black screen with nunlock working but I test a 5850 and my note worked like a charm again but now when I turn on the nunlock only respond for a little moment
I am a bit afraid with this because maybe my motherboard doesn't work
I was thinking that happened because my video card already fell on the floor
And the notebook doesn't recognize it anymore! I hope that is it
I will try the 5850 again but it is going to take some time to do it!
And I had an idea to put a blower fan next to the heat sink tha is use to cool down th e VRMs
What the guys thinking about it? -
0_o I would of never suspected. Wow... how terrible.
-
Glad to see this is back
Sent from my SCH-I535 using Tapatalk 2 -
I should be getting my 240w Alienware PSU, copper heatsinks, just the long copper ones though, and hopefully tomorrow or sat I will get my 7970m Clevo I bought from a user here. Just odd I can't track it though hmm Anyone ever hear problems tracking internationally a package ship from Australia?
-
First step done. The 240W PSU arrived today. I was going to pull both PSU's apart and unsolder the points on the board, but once I opened the Dell one I realized it might be a bit of an issue. I wish I would have opened the ASUS one because after I snipped the cord I realized that the ground wire wasn't its own individual wire, it was almost like a shielding around the power wire. So what I did was strip the wires back, use some electronics flux, soldered them together, heat shrink, rubber isolation tape, and finally electrical tape. The ASUS PSU has one shielded wire that is white and one non shielded braid around it which is the ground. The Dell PSU has 3 wires, green is unused, black is ground (will go to the non-shielded wire) and white which is power. If you have a meter check and make sure you have 19V to the pins. The ASUS pin the outer metal is ground and the inner is positive.
Now to wait for everything else to show up. The GPU sink and the card. -
yea i've heard the same about the psu. could you post some pics for us? this thread is lacking pictures in the psu modding.
-
I didn't really take any to be honest I can take a picture now, but it's all taped up. It's stupid easy to be honest.
If you know how to solder you will be fine. otherwise you may run into some issues -
Here is the ASUS Cable as I cut it:
![[IMG]](images/storyImages/20121101_155114.jpg)
Here is how I wound it up to make it into a solderable wire:
![[IMG]](images/storyImages/20121101_155058.jpg)
And finally here is the 240W PSU:
![[IMG]](images/storyImages/20121101_155201.jpg)
I'm pretty sure the green wire was for some sort of LED on the Alienware.
And my new UGLY PSU
![[IMG]](images/storyImages/20121101_155901.jpg)
I didn't take any pictures of the soldering, but you can just google those for how they should look. The solder should look shiney when you are done. Also tug on them to ensure you have a good connection. Make sure you get as many of the free strands on the ground side of the Asus plug so you will have a good ground. -
Why didn't you just open up the ac adapter and desoldered the dell wires and solder on the asus wire?
Never mind just read the previous post. -
lol i was about to say the same thing, but still thanks for the pictures
-
The plugs in the Dell were going to be a ****** to do. There was some sort of metal shield around the entire unit. even though I took off all the tape it still didn't want to budge. I might just order a used 150W adapter from fleabay. I also didn't realize that the wires on the ASUS were so jacked up.
I'm happy with it for now. I plan on keeping this laptop for the foreseable future if this mod works. If not, I'll be contacting Xotic PC or another reputable dealer for a new one. Hell might as well go big and get the new M18X. That way I can add this card if I don't fry it. Either that or a Sager. -
It back heheh thanks admin this thread needs to say alive !!
Long live the g73jh hehe eneyway people do not stick the vrm heatsinks on till you have flashed it and tested in one game the heat will not damage the vrms as they can take 120c all day they are well made parts just have a fan blowing on them wile you test it as that's what I did you can easily stick then on though the service panel also they are the same ones I brought for mine !! I had to cut the long ram heatsinks down a bit at the sides as they are a tad close for my liking properly just sand them a bit best advice I can give you !! and please please don't use the sticky pads provided they will MOVE WHEN THEY GET HOT AND IS A BIG RISK TO SHORTING THE CARD OUT I USED THERMAL GLUE !! once I known it was running fne also helps get rid of the heat quick. And also I just started work on my micro pump to water cool the g73 just winding my mini brushless motor for the pump but then I've got to make the circuit to run it lol only bxxxx is I have got to make it surface mounted lol plus the circuit board and that ant going to be easy but once one is done the rest are easy bet I could sell it to a company after but I'd rather help my fellow g73 s lol if I get it working fine then I will make th rads and post pics I want the pump to push 2L a minute minimal also its only going to be the size of a 2pound coin !! Small ant it please tell me your thoughts on this people thanks -
i think your a mad scientist on the verge of making a monster
-
Your saying not to use the heatsink for the vrm in the beginning? Why? Would it matter if they had the heatsinks prior to the flash? I'm doing this project tomorrow I should get my 7970m today.
I might use thermal tape for now, they tend to stick like super glue but later I may take your advice.
-
I'll have a go at just about everything lol I nodded my Asus rampage extreme 2 motherboard on me pc and managed to get my i7 920 running at 5.45 GHz with hyperthreading on aswell as the turbo lmao and that's justwater cooling max temp 64c Lmao and that's got 2 GTX 580s and the mobo in the loop I'll do the same to me laptop when I've done the watercooling for the laptop I will be modding the power circuitry in the laptop so I'll be able to pull 240w out of the motherboard instead of 186w there is a real easy way to do this it's just the same principle as the military do I'll share all the info when I have finished hopefully this side of Xmas n ill show the alienware heads something to bow down to when I clock the CPU at 4ghz plus and overclock the heel out of the gpu
-
Hey Cuban! Could send the 7970 vbios?
-
Just got my 7970m! I'm working on modifying the stock heatsink,
-
Good news!
I am waiting for the great pictures!
What will you do to cool your card?
Sent from my iPad using Tapatalk HD -
ITS IN AND THE SYSTEM BOOTS!
Just need to blind flash the darn thing. -
hi im a new member from the philippines, i own a g73JH-A1 and i know that my machine is truly showing its age ( 2 years already with my hands with 0 defects) except of that faulty creative/realtek sound drivers that gives me weird static sounds that i have already uninstalled
i have just flashed my bios to v213 and vbios 0.93 flash and i just followed the instruction in the ROG site
now i just have read that g73's potential to have a hardware upgrade (particularly a gpu upgrade) is possible
i just wanna upgrade to a 7970m, im a hardcore gamer, i just dont want to spend so much money on a new laptop, for those who will ask how much a 7970m a friend asks me, he will just sell it for 300$
desktop is not an option :3 i already have my desktop, but as far as im away in my house, i cant play the games i have used to play anymore, (BF3 multi, sc2 and dota 2) 5870m really gives me unpleasable FPS, its time for a 28nm
can you please write a step by step instructions on how I will upgrade my gpu... (already have 920xm) thx!
im an adventurer at the same time so opening my lappy and cleaning the internals is a no-brainer for me
-
ALRIGHT GUYS, BRACE YOURSELVES, THIS IS THE MOST JERRY RIGGED MOD EVER DONE TO A G73JH lol. You guy might get a kick out of it.
It's up and running perfectly. Running 3d mark 2011, so far its about 76'C full load and 50''C when idle! I'm running a few benchmarks. I'm also using driver 12.10. Also decided to double to .5 thermal pads, so technically I'm using 1mm. Again this was done with a Clevo 7970m. Fan works perfectly and HDMI out works AWESOME!
Are are some pictures.
I did not move the thread over. My soldering skills are near none existent. I think the picture spears for itself as far as how I mounted it ;p
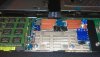
I used heatsinks I had laying around. I think I got most of the parts that needed a heatsink.
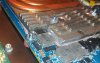
My soldering skills were none existent so I had to be creative! lol it works and less work.
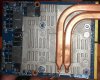
I didn't use the X back plate, was pointless the screws were not long enough so again, I had to be creative. Used some long screws which I cut down to size, used the nut to tighten it up ever so gently.
And I also modified the dell 240w PSU the same way as the other guy did who posted some pictures.
I had trouble flashing the vbios, but then realized the bat file needed the ati flash lol ;p -
Wow!!! Great temps!
This is a clevo card right?
Hdmi works with audio?
And can you share your vbios for us?
Congratulations men! I waiting for my card arrive -
congrats, hope to hear that its already rock solid stable
awaiting for further updates :3 -
So far, i'm running kombustor, temps will not go passed 77''C. Going to leave it running all night. It's almost 3am right now. I'll update in the morning or afternoon (I sleep in late ;p)
by_cleiton, yes its a Clevo. Keep in mind I did not to this the conventional way, I think this is a lot easier to do and involved less work. Most of the parts you can get from your local hardware store. Machine screws were a great life saver.
HDMI works, I have not tested the sound yet though. I'm looking for the vbios, don't remember where I got it from, I know it was from a member around her.
If you don't have the soldering skills as I do, do what I did, use washers ;p
I found that user machine screws instead of the X backplate was more effective and easier to work with. Just cut the screw, re thread, your ready to install the stock heatsink. -
I can't download it!
Can anyone send it? -
Hello g73dalmeme, just like you, I'm from the Philippines also. If you're interested to mod your G73JH to upgrade its GPU, I believe you'll have to start reading the whole thread on http://forum.notebookreview.com/asus-gaming-notebook-forum/641007-g73jh-6970m-upgrade-infomation.html then next one is this whole thread. Reading and understanding what all in these threads will inform you on what preparation to do. One of these things is either to get the Targus 180W PSU if you just want to upgrade your CPU only (to 920xm or 940xm) or to mod the Alienware 240W PSU (by replacing its cord with the cord from your current Asus G73JH 150W PSU).
Be prepared to do an Iron-Man-2-like-hardware-mode to sand/grind/cut some parts of your heatsink and also to bringing your wits to a new level by figuring out how to address the screw size issue for the new GPU that you'll install. You'll also need to have the right tools AND skills (heat gun, soldering tool for example) if you want to customize your heatsink by adding another copper rod, or placing the 2 copper rods of the G73JH heatsink to a heatsink of another gaming notebook that's feasible for the G73 structure. You'll definitely upgrade your PSU because the 6970m or 7970m consumes more power than the 5870m as on the stock G73JH, power consumption is:
HighPerformance Profile(high cpu clocks) + PowerPlay Maximize Performance(400/1000 clocks) + Normal Usage (surfing only) = 72-88W
BatterySaving Profile(low cpu clocks) + PowerPlay Maximize Performance(700/1000 clocks) + Furmark Benchmark = 152W
HighPerformance Profile(high cpu clocks) + PowerPlay Battery Saving(100/150 clocks) + Prime95 Benchmark= 112-116W
You see in there, one of the scenarios reached 152W and you don't want this to happen as this would destroy your stock 150W PSU if you do this more often. You would also need to prepare for several thermal pads and thermal paste (and also thermal cleaner like ArctiClean but optional). You should be also confident to open up the G73JH a LOT of times without breaking the speaker cable and other stuff, and also observing electronics SOPs like grounding yourself more often to save your hardware from electrostatic discharges. So much for the hardware related requirements and I hope I didn't forget to mention important things.
On the software side, you would need the help of other NBR members to provide you the modded vbios that they used and worked on their GPU mod. You'd be reformatting your OS definitely if you want to make sure that your new GPU would work as it should and might do this more often so having an SSD for the OS drive would save your time. I don't know all of the software-related stuff for the GPU upgrade of the G73JH so I strongly recommend you to start doing your research on the 6970m thread then on the 7970m thread just like doing your college thesis seriously.
In my case, I don't know if I have the capability to do a mount-everest-hiking-challenge like attempt to upgrade the GPU of my G73JH. But surely I'd consider replacing my i7-720qm with a 920xm or 940xm if its price reach around $300-400 for the OEM version, to make my current 8Gb RAM to 16Gb (as I abuse the use of VMWare Workstation and VirtualBox a LOT), and changing my OS drive to a high-performance SSD perhaps. -
With washers? You're the man! Great workaround btw :thumbsup: I hope it does not add an alarming pressure on your mobo. Is the thermal adhesive tape you used on your copper heat spreaders not hard to remove? I hope it does not leave residues making your electronic components messy.
-
Hi f9z well done mate glad u have got it running ps kompbuster will not fully load the card Lmao never dose its a bad software run furmark Ull hit 90c I bet lol ps can u overclock the gpu
-
what are those washers made out of?
-
I'm still looking for my download link that was sent to me.
Yeah lol And no it's VERY little pressure, that's why I used paper washers, they tend to compact as you compress. But it worked. Doesn't really matter if its hard to remove, I mean all you do is use goo gone and that stuff dissolves.
I'll try it. I was running 3dmark 2011 for about 30 minutes with same results. I went from 50''C to 77''C.
Paper/cardboard like material.
System is still running. -
I love this mod, colour me impressed.
Are your power numbers from the wall or before the brick? As the brick has its own losses which will be at least 10%. The PSU is rated at system draw.
A 150W PSU at max load will draw at least 165W from the wall and give the machine 150W.
However it does not hurt to have extra breathing room. -
So I contacted the seller on eBay. My GPU tested fine this past Friday. He is shipping it out tomorrow. I'll be gone all next week so I won't be able to do anything until next weekend. I already have the secondary heatsink so that will be modified as well. OH, and my thermal tape is here.
-
Yeah, furmark brought that b!tch up to 91''C lol Which I am guessing my your comments it's normal.
What numbers are you referring to?
@ Cuban, what's your progress on your mod? -
If you're pertaining to the power figures that I posted, I got it from the PowerChute software provided by my APC UPS as it's sending data to the laptop via RJ45-to-USB cord, while having only the G73 PSU plugged in to it. PowerChute says it's the the amount of power that the battery backup is providing when I'm running those tests so there I assumed that the 150W PSU won't be able to supply enough power when I run Furmark at the same time with Prime95 in anger
-
My system blue screened lol. Didn't see what the last temperature reading were. I know it had reached 93''C. Could be nothing. Might be something.
I have notice the VRM's get SUPER SUPER HOT. I wonder if the copper is providing enough cooling... -
I think for the mean time, you should remove your bottom panel for better air flow if you haven't yet. You could also have it sit on a notebook cooler temporarily and make sure you're room is on air-conditioning.
-
It will not be the vrm they will take 120c mite be the fact that u have used the crap tape the heat dissipation of that tape is a joke it isn't enuf mite not be getting the heat away from the inside of the rvms U HAVE TO REMEMBER THE BASIC PRINCIBLE HEAT BUILDS UP INSIDE IS ALWAYS HOTTER THEN IT GETS TO THE POINT IT CARNT GET RID OF THE HEAT . Will be hot on the vrm like I said glue lol use the thermal past heat adisive stuff can be taken of also mite be drives causing this as mine did till I driversweepered it lol
And 93c is high but a game will never push it that much as furmark is made to hot force all parts of the GPU eg puch evey part to max factory build specs
BET U ALL WANT ME TO DO WATERCOOLING NOW LOL -
As far as regular gaming, it will work fine, ran for 12 hour no crashing. If I stress it like I did with furmark, then obviously heat is an issue somewhere, maybe like you said, I need better material to transfer the heat away from the vrm's. The tape more so to test the water with.
What is the best thermal paste adhesive? Artic Silver? I'll probably ad more copper heatsinks since glue can handle more weight and will not fall off like tape will.
If you do a water cooling kit, would you consider selling it or is it just for you? -
When I have built one I will make more and sell them if there is enuf intrest in me to do so I want evey1 who would like 1 to share intrest in this tell me if they would want 1 as it will keep it within the 60-70s range on furmark so gaming 55c maybe less and hopefully 60- 70 on the i7 940xm @ 3.6 - 4ghz mark lol
PLEASE TELL ME WHO IS INTRESTED PEOPLE -
It's in hold until I get the card. Next weekend u should be up and running
Sent from my Galaxy Nexus using Tapatalk 2 -
Is this a water cooler?
Or is it a heat sink mod?
How much is it?
If this wont be expensive I will buy one
-
晕,看见超频三了 国内的么?我也是哈。
Are you from china? -
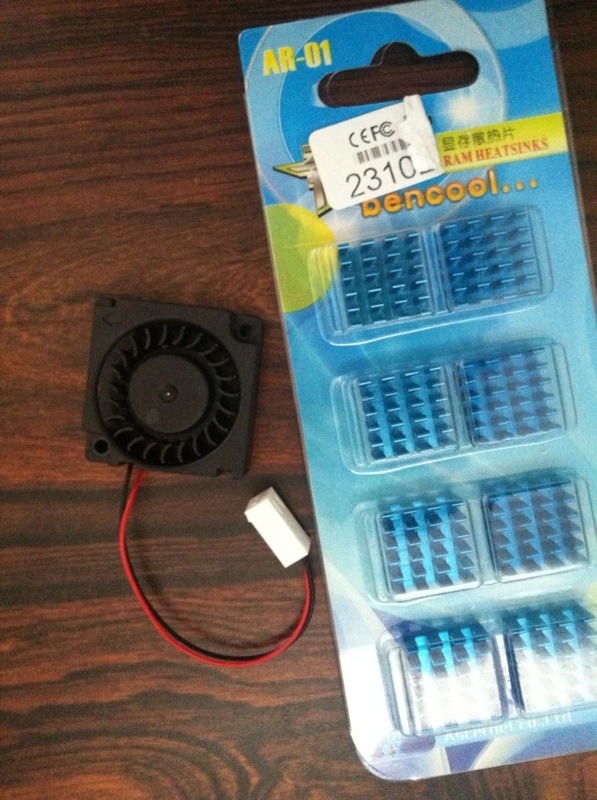
Yes! I Will put this for a better cooling performance in my VRMs!
Sent from my iPad using Tapatalk HDAttached Files:
-
-
No I'm not from China. I'm from the US. Those parts came from Amazon.com
@bycleiton, what size fan is that?
Sent from my SCH-I535 using Tapatalk 2 -
http://www.ebay.com/itm/130473642510?ssPageName=STRK:MEWNX:IT&_trksid=p3984.m1439.l2649
I will use it next to the wifi card and this is a blower fan!
Sent from my iPad using Tapatalk HD -
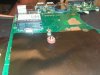
I already put the power cables
I used the power from the VGA cooler so I don't need to USB adapter
Sent from my iPad using Tapatalk HD![[IMG]](images/storyImages/gaha6eqy.jpg)
-
Has eney1 got a spare g73 gpu heatsink or know where I can get 1 as I need to measure it up eg to get the depths required to make a water block out of pure copper ! CPU side heatsink is easy to do I carnt put a price on the wateecooling yet due to the fact of material cost and time lol
ATI HD 7970M ON ASUS G73Jh
Discussion in 'ASUS Gaming Notebook Forum' started by new2019, Apr 19, 2012.