I agree that is not a good idea. But, there is no reason to do that. The scuff pad that Coollaboratory includes is not made of metal and it works fine. It causes no harm. You can also use acetone when alcohol is not enough. Liquid metal drying out is merely a symptom of poor heat sink fit. That needs to be fixed and once it is, drying out will no longer be an issue. Fixing the poor heat sink fit will also improve temperatures. And, it will last almost indefinitely. I went over a year with CLU on the 4930MX in the Alienware 18 (could have gone longer, but I disassembled it for other reasons) and @Papusan went more than 2 years on his Alienware 17. In both cases, no degradation of temperatures was observed.
-
-
The very small alcohol wipes you get from pharmacy work wonders with ok quality isopropyl and cotton swabs.
And Liquid Ultra on my Aw 17 is now 3.5 years and still in good shape. No paste or Liquid metal will work long time if the heatsink is ****y. Even ICD will pump out.
Edit. FYI Silicon lottery has started with Grizzly Conductonaut. Please see my post in the Clevo OC thread. Info there!!Last edited: Aug 2, 2017Mr. Fox likes this. -
By the way, I have svets moded bios, but for some reason, if I undervolt the cpu in the bios, the voltage is no modified until I open xtu. If I overvolt it does work without opening xtu. How can I solve this behavior? I just want to set my cpu speed and voltage in the bios, don't want to open xtu everytime I boot.
-
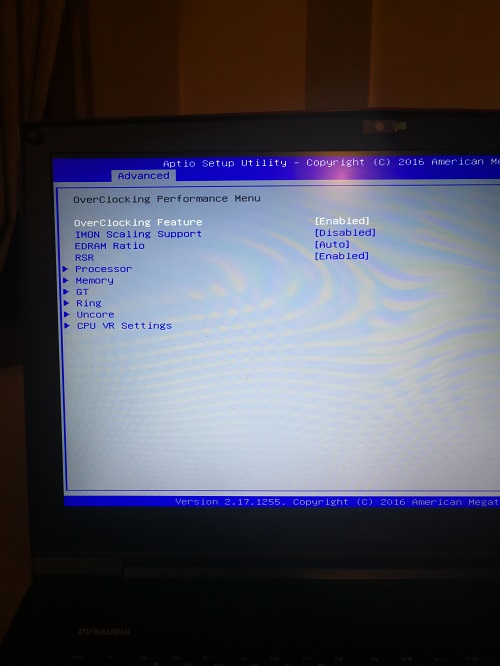
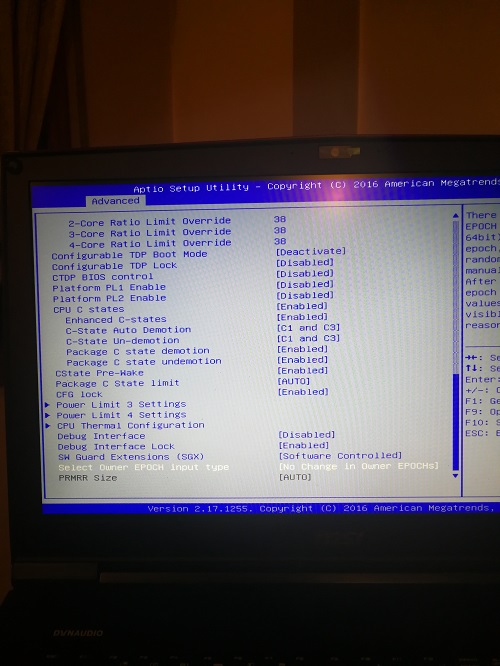
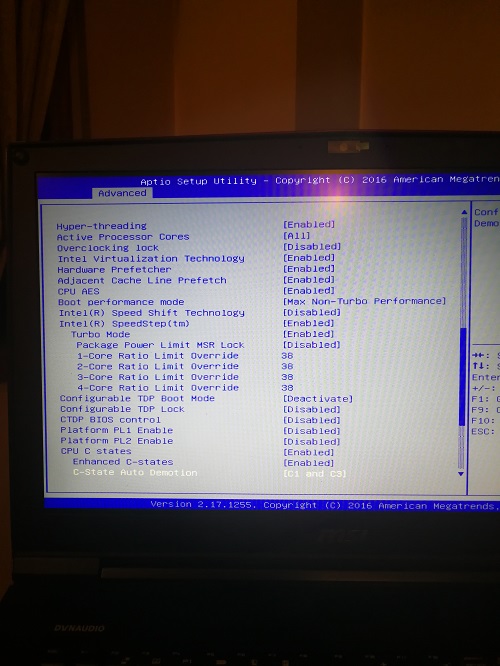
Look around and make sure you have overclocking set to enabled. It may be set to disabled, and it may be found on more than one menu. There is a switch on the menu with the c-states and another switch on the overclocking menu. It needs to be set to enabled in both places. While you are looking for that on the overclocking menu, also be sure the maximum overclock ratio (above the field for voltage) is not set to zero. Setting that to zero effectively disables overclocking. Set it to a value higher than your selected core ratios. You can just max it out by setting it to 83.hmscott likes this.
-
Master Papusan,
how do you keep liquid metal working on your hardware when you live in sub zero temperatures?
Don't you have to deal with up to -150 degree temps?
I thought LM/Grizzly Conductonant will harden and expand at lower than 0C, making it worthless and possibly cracking the die?hmscott likes this. -
I don't use my hardware in sub-zero temp. Normally 16-22C where I use my machines. Often up to 30C home if my wife went mad with the firewood in the Big Fireplace. A few times 14-17C. Never use Liquid metal if Your normal ambient temp inside is 0-10C(daily use)!! With good prep of your cpu cooling you can manage idle Cpu temp same as your ambient temp. Hardware Temp below 10C ain't good if you use Liquid metal. Liquid metal will lift the cooling(HS) from die/ihs if temp stays lower than 8-10C.
Please see my posts regarding lapping. You can see how well Liquid metal was after several hard months use. You find a lot info about Liquid metal in all my posts in different threads. As well my post regarding Silicon Lottery in Clevo OC thread.Last edited: Aug 2, 2017hmscott and Falkentyne like this. -
How do you know you are undervolting the CPU in the Bios correctly? Screenshots of your bios screen?
How do you know for a fact that the undervolt is not being picked up in windows?
Did you set the undervolt in XTU previously?
Are you running Throttlestop on load?
Do you have profiles on throttlestop?
What are the throttlestop FIVR profiles set to?
All you need to do to undervolt (this REQUIRES an unlocked Bios):
1) Overclocking Lock: Disabled
CPU overclocking: Enabled
Offset voltage (negative).
Pretty sure Throttlestop will show the undervolt if you install it to a new folder (not 100% sure about this though). HWinfo will definitely show it. A clean install of XTU should also show the undervolt instantly.Last edited: Aug 2, 2017hmscott likes this. -
Thank you Papusan.
I have 11 grams of Kryonaut (to replace an older tube) and 5g + 1g of Conductonaut coming in tomorrow (the 1g comes in today). it will be my first time considering using LM..... -
Don't forget buying kapton tape or similar electric tape. Important at least first time you use Liquid metal. Better be careful and happy than sorry.
-
I was going to use transparent nail polish to cover the transistors on the CPU. I also have foam I can use, but i would rather use nail polish and foam over that.
I dont know if it's called neoprene or not.
If you wish, I can take a picture and post it. If I can figure out how to cut the foam.
Isn't transparent nail polish all that is needed?Papusan likes this. -
Even easier that this, simply delete or rename ThrottleStop.ini and when you launch ThrottleStop the next time it will create a new one and adopt the values set in the BIOS for all 4 profiles. From there you can tweak each profile to your liking. It is not necessary to install it to a new folder. If you were to only move it to a new folder and leave the old INI file it will continue using it.
Yes, nail polish will work perfectly fine. So will a thin layer of RTV silicon, electrical tape, liquid electrical tape, Kapton tape or Scotch tape. My personal preference is something that can be removed easily, like electrical tape or Scotch tape, and Kapton tape is my favorite since it sticks really well, sustains high temperatures and easily removes with no sticky residue. Liquid electrical tape also works really nice, but it doesn't store well long term. I have a bottle of it that I hardly used and it's almost no good now (getting too thick to spread as it ages). I like how it peels off like a stretchy sheet of rubber.Last edited: Aug 2, 2017hmscott, Falkentyne and Papusan like this. -
You will only save your chips with nail polish. I talk more about the other components on MB, if Liquid metal go outside the chips.hmscott likes this.
-
Sorry for taking so long. @Papusan @Mr. Fox here is what I was talking about.
Apply nail polish over the CPU transistors (this won't affect Kryonaut or Conductonaut usage),
then if necessary, cut out one of these two foam pieces, from the inside in the shape of the CPU *BGA filth* slug, razer the shape of the CPU slug out, and put the foam pieces around the slug, after applying the nail polish.
I assume I would use the piece on the left, because it's thinner and probably more resistant to heat, right?
I'm guessing the spongy one on the right is bad. the right one is spongy and can be compressed very thin, but I'm afraid of static from that thing or temp resistance...
The left one is very thin and much tighter. I got it from packing material from some items, but is this called neoprene? It definitely isn't durable...it's like some type of thick foam...
But would using the thin strip on the left (after cutting out the CPU shape in it) cause problems, like less pressure from the heatsink?
![[IMG]](images/storyImages/3lDusUp.jpg)
-
Yes, that should work fine. In fact, I have been thinking about doing exactly the same thing for both of my 1080 GPUs and putting liquid metal on them. The idea is to have a barrier so you can travel or toss the laptop around in a backpack willy-nilly without any fear of the liquid metal dripping out and shorting something. The foam would do great for that. You would still want to use something like Kapton tape for the surface mounted components close to the liquid metal, like those on the CPU or around the GPU. I would not rely on the foam for that protection.
I doubt the temperatures would hurt it. I would recommend using the softer foam that easily compresses to almost nothing without resistance. Make the square hole in the middle large enough to not accidentally get pinched between the heat sink and die.
There is no need for any of this with Kryonaut or non-metallic thermal paste. Only liquid metal (or other electrically conductive paste, such as Liquid Copper metal particles suspended in a silicon based paste) requires these precautions.Last edited: Aug 2, 2017Falkentyne and Papusan like this. -
Don't make it too difficult. Use big size Kapton tape. It's intended for use on PCB/components.Falkentyne and Mr. Fox like this.
-
-
BTW - love the Tommy Lee Jones avatar. That same image is one of my favorite memes.
![[IMG]](images/storyImages/lzPSK6B.jpg)
![[IMG]](images/storyImages/b699c801bafe77a4dddc5355634d48038f6f6560504b705fe08a318b497c54a7.jpg) Spartan@HIDevolution and Papusan like this.
Spartan@HIDevolution and Papusan like this. -
Some needed teach you how to swim, although the teacher himself can't swim
 @Phoenix
Spartan@HIDevolution likes this.
@Phoenix
Spartan@HIDevolution likes this. -
-
-
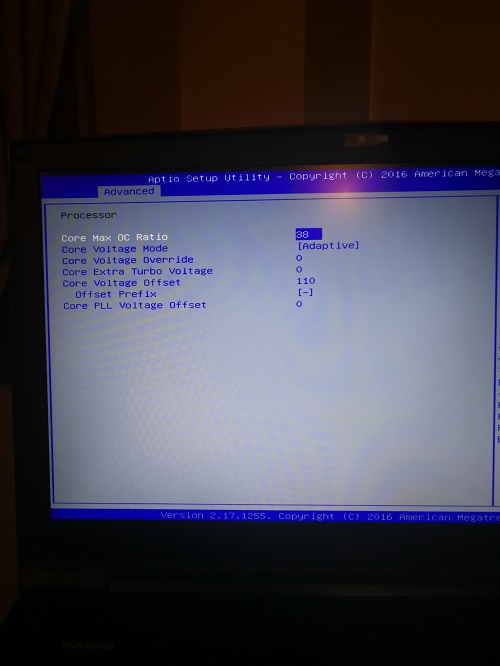
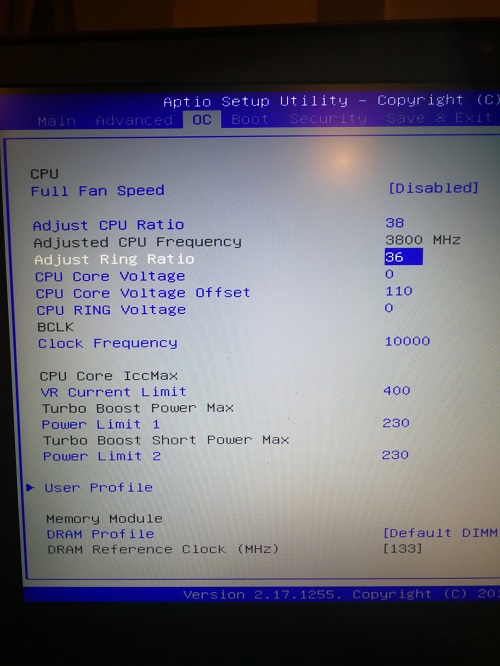
Here are some pictures. What is wrong??? I´ve checked that the undervolt is not working with aida64. It shows the normal voltage until I open the xtu. Then the undervolt works just fine.
Attached Files:
-
-
Your settings look completely fine.
Look in one of the CPU settings (should be at the bottom by CFG Lock) and make sure Overclocking lock is disabled. (it's in a different area than the "RSR" settings with the XTU interface option). -
Your BIOS screens look totally different than mine. But, where I would find it is in the menu shown in the photo below. I cannot show you the actual switch @Falkentyne and I mention because the Prema BIOS eliminates any need for that worthless thing to exist. I had it unlocked permanently and removed it so it could be changed.
Falkentyne likes this. -
@Papusan @Mr. Fox @Phoenix @iunlock
and I DID IT!
I DID IT!!!!!
THE FIRST TRY TOO!!
CPU TEMPS ARE DOWN BY AT LEAST 10C ON ALL CORES, core differential in Stockfish chess engine @ 4.5 ghz (1.1v) was 2C, temps 73/71/73/71 after 5 minutes of Stockfish 8 thread chess engine calculation (it's around 85 degrees (F) in my bedroom at night, hot day in California, and humid 99%....), I think that's 30C ambient (not sure), but it's very hot and uncomfortable inside.
2C difference on all cores.
Cooler Boost fans were at 100%.
Prime95 small FFT (AVX/FMT are disabled) no longer skyrocketed to 90C. Prime was a little hotter as expected but at least its runnable now (I refuse to run it with AVX. If games and Witcher3 want to use AVX it can use AVX). Cinebench 999 points.
THIS WAS SO worth it.
Didn't see any actual resistors on the BGA filith 7820HK, but there were some..uh...silver things...I threw a coat of nail polish on them then I put that foam over it (the spongy thicker one) around the CPU slug to act as a "Dam." I felt the spongy one was too thick even though it can compress a lot, so I trimmed the thickness by half, cut out a shape of the CPU slug in the middle and wrapped it around it.
*edit* one loop of prime 95 small FFT in a cooler room now (AVX/FMA3 disabled) gave temps 74/72/74/73.
Now...the big question is if I will have a Conductive Ball of Doom running around the motherboard when I carry around the laptop or not...Last edited: Aug 3, 2017Mr. Fox, Atma, Papusan and 1 other person like this. -
^^Nice. I purchased liquid metal and was all set to do the delid on my 6700K but after some thought I can't see it being a good idea for me. I carry my laptop around with me weekly for days on end, and it's subject to different environments and atmospheric pressures regularly. I have this feeling that if I were to go ahead eventually some of that paste would end up somewhere it shouldn't be and I would end up shorting something. If i were to keep this laptop on a flat surface or desktop all day then I would probably go through with it.
hmscott likes this. -
The trick to not having LM leave the CPU slug isn't tape. it's a dam, like the airline pilot made. Because the CPU slug insulation isn't the problem at all. It's the *heatsink*. The heatsink is completely flat and while there may be tape to catch any drips on the CPU slug side, there isn't any on the heatsink side, for when the laptop is sideways or upside down, etc. Simply having a thin layer of compressible foam (thicker than the space between the CPU area around the slug, and the heatsink, but spongy enough to touch both the cpu and heatsink sides, will protect from any accidents.
Just cut out a rectangle for the CPU slug to cleanly reach the heatsink then have a ring of foam around it. -
Welcome to the bright side brother
 Your Next changes must be going for fully socket hardware!! Aka the FULLY bright side
 + rep bruh
@Phoenix
@hmscott
@Mr. Fox +++
+ rep bruh
@Phoenix
@hmscott
@Mr. Fox +++

Edit. Enjoy!!Last edited: Aug 3, 2017Falkentyne and hmscott like this. -
hi guys i have a msi gt73vr 6rf 6820hk i have been getting regular bsod crashes for a while cant seem to figure out whats causing them. Using the stock os the laptop shipped with drivers are mostly upto date the crashes occur regardless of over clock and regardless of what im doing on the laptop sometimes it even crashes when i shutdown the laptop sometimes in game sometimes browsing chrome so you get the picture. I have whocrashed installed and i cant make sense of what i should do next im thinking fresh install but id prefer if there was another way however i did make a recovery usb when the msi popup prompted me to however knowing my luck it probably doesnt work haha. here is a copy paste of whocrashed report.
I would really appreciate any help/advice please let me know if you need any further information from me
System Information (local)
Computer name: MSI
Windows version: Windows 10 , 10.0, build: 15063
Windows dir: C:\WINDOWS
Hardware: GT73VR 6RF, Micro-Star International Co., Ltd., MS-17A1
CPU: GenuineIntel Intel(R) Core(TM) i7-6820HK CPU @ 2.70GHz Intel586, level: 6
8 logical processors, active mask: 255
RAM: 34315276288 bytes total
Crash Dump Analysis
Crash dump directory: C:\WINDOWS\Minidump
Crash dumps are enabled on your computer.
On Tue 01/08/2017 11:19:49 your computer crashed
crash dump file: C:\WINDOWS\Minidump\080117-6812-01.dmp
This was probably caused by the following module: ntoskrnl.exe (nt+0x16C4C0)
Bugcheck code: 0x3B (0xC0000005, 0xFFFFF80015409FC7, 0xFFFF988137534BF0, 0x0)
Error: SYSTEM_SERVICE_EXCEPTION
file path: C:\WINDOWS\system32\ntoskrnl.exe
product: Microsoft® Windows® Operating System
company: Microsoft Corporation
description: NT Kernel & System
Bug check description: This indicates that an exception happened while executing a routine that transitions from non-privileged code to privileged code.
This appears to be a typical software driver bug and is not likely to be caused by a hardware problem.
The crash took place in the Windows kernel. Possibly this problem is caused by another driver that cannot be identified at this time.
On Tue 01/08/2017 11:19:49 your computer crashed
crash dump file: C:\WINDOWS\memory.dmp
This was probably caused by the following module: afd.sys (afd+0x63E12)
Bugcheck code: 0x3B (0xC0000005, 0xFFFFF80015409FC7, 0xFFFF988137534BF0, 0x0)
Error: SYSTEM_SERVICE_EXCEPTION
file path: C:\WINDOWS\system32\drivers\afd.sys
product: Microsoft® Windows® Operating System
company: Microsoft Corporation
description: Ancillary Function Driver for WinSock
Bug check description: This indicates that an exception happened while executing a routine that transitions from non-privileged code to privileged code.
This appears to be a typical software driver bug and is not likely to be caused by a hardware problem.
The crash took place in a standard Microsoft module. Your system configuration may be incorrect. Possibly this problem is caused by another driver on your system that cannot be identified at this time.
On Mon 31/07/2017 05:07:03 your computer crashed
crash dump file: C:\WINDOWS\Minidump\073117-7390-01.dmp
This was probably caused by the following module: ntoskrnl.exe (nt+0x16C4C0)
Bugcheck code: 0xC5 (0x28, 0x2, 0x0, 0xFFFFF800DE4871D3)
Error: DRIVER_CORRUPTED_EXPOOL
file path: C:\WINDOWS\system32\ntoskrnl.exe
product: Microsoft® Windows® Operating System
company: Microsoft Corporation
description: NT Kernel & System
Bug check description: This indicates that the system attempted to access invalid memory at a process IRQL that was too high.
This appears to be a typical software driver bug and is not likely to be caused by a hardware problem. This might be a case of memory corruption. More often memory corruption happens because of software errors in buggy drivers, not because of faulty RAM modules.
The crash took place in the Windows kernel. Possibly this problem is caused by another driver that cannot be identified at this time.
On Sun 30/07/2017 00:00:51 your computer crashed
crash dump file: C:\WINDOWS\Minidump\073017-12437-01.dmp
This was probably caused by the following module: ntoskrnl.exe (nt+0x16C4C0)
Bugcheck code: 0x1A (0x41793, 0xFFFFF93FFAE00000, 0x1, 0x0)
Error: MEMORY_MANAGEMENT
file path: C:\WINDOWS\system32\ntoskrnl.exe
product: Microsoft® Windows® Operating System
company: Microsoft Corporation
description: NT Kernel & System
Bug check description: This indicates that a severe memory management error occurred.
This might be a case of memory corruption. More often memory corruption happens because of software errors in buggy drivers, not because of faulty RAM modules. This problem might also be caused because of overheating (thermal issue).
The crash took place in the Windows kernel. Possibly this problem is caused by another driver that cannot be identified at this time.
On Thu 20/07/2017 10:16:59 your computer crashed
crash dump file: C:\WINDOWS\Minidump\072017-6656-01.dmp
This was probably caused by the following module: ntoskrnl.exe (nt+0x16C4C0)
Bugcheck code: 0xC5 (0x8, 0x2, 0x0, 0xFFFFF800E12901D3)
Error: DRIVER_CORRUPTED_EXPOOL
file path: C:\WINDOWS\system32\ntoskrnl.exe
product: Microsoft® Windows® Operating System
company: Microsoft Corporation
description: NT Kernel & System
Bug check description: This indicates that the system attempted to access invalid memory at a process IRQL that was too high.
This appears to be a typical software driver bug and is not likely to be caused by a hardware problem. This might be a case of memory corruption. More often memory corruption happens because of software errors in buggy drivers, not because of faulty RAM modules.
The crash took place in the Windows kernel. Possibly this problem is caused by another driver that cannot be identified at this time.
Conclusion
47 crash dumps have been found and analyzed. Only 5 are included in this report. No offending third party drivers have been found. Connsider using WhoCrashed Professional which offers more detailed analysis using symbol resolution. Also configuring your system to produce a full memory dump may help you. -
Overclocking lock is already disabled...any other ideas on how to solve this problem???
Any pictures of the process??? -
I like this idea very much....what kind of foam should we use? where do we buy that?
-
Did you fix it? That's one of my favorite games (as are all of the other titles in the Crysis franchise). It's as much fun today as when it was released in 2013. I've played it through I don't know how many times. I wish they would make more games that are this good. Remember this commercial?
-
I used regular spongy packing foam that came in a keyboard keycaps packing box. Any hardware or hobby store should have something like that. I don't even know if foam is the right word, rather than insulation packing material. Just make sure its not too stiff because you dont want resistance from it stopping proper pressure from the heatsink. 3mm thickness should be fine. You also don't want it too thick because you need to get the heatsink on it directly from the top, so it doesn't move (by catching on the heatsink prematurely while trying to install the heatsink) and start covering over the silicon and LM, and there isn't a lot of room for that in laptops. I put the nail polish on first, let it dry, then put the foam on after. That way if I ever need to go back to Kryonaut in case I decide to go live with @Papusan in -150 degree temps, the foam isn't attached to the nail polish.
I definitely prefer the cutout foam method + nail polish over tape (Tape+foam ALSO works) because the foam isn't to protect the CPU tiny transistors; it's to protect the mainboard from any sort of runoff (aka like a Dam).
I got the idea from this post so you can try what he did:
http://forum.notebookreview.com/thr...ol-laboratory-liquid-ultra-pro.791489/page-38Last edited: Aug 3, 2017Papusan likes this. -
I'll ask you again:
What are you using to check for the undervolt before you run XTU? Because there should be no problems at all. -
aida64 extreme stability test
-
Aida64 shows the proper VID?
Check using HWinfo64 please.
You can also try turning "XTU Interface" in Bios to disabled as well.
I'm not sure how well that setting works with it set to enabled (not even sure exactly what it does).
I can't help fix your problem because I don't have this issue on my GT73VR 7RE.Last edited: Aug 3, 2017 -
If anyone mentioned it I missed it, but MSI posted a new audio and Nahimic driver on 8/1 for the GT73VR 6RE and probably other models.
-
@Falkentyne - kind of like this? Did you try this yet? I found some 1/8th inch foam rubber in a box that my 120Hz screen for the Tornado F5 came in. It effortlessly compresses to near nothing and was easy to cut with a razor blade. Should make a perfect liquid metal container/barrier for GPUs. I may try this later tonight. Maybe Brother @Papusan would like to try it as well.
If you are using Kapton tape around the GPU die to protect the surface mounted elements, you could put a small drop of superglue on the tape in a couple of spots to keep the foam from moving around during reassembly.
![[IMG]](images/storyImages/GPU_Shroud.jpg)
![[IMG]](images/storyImages/Easily_Compressible.jpg) Last edited: Aug 3, 2017Papusan, j95 and Falkentyne like this.
Last edited: Aug 3, 2017Papusan, j95 and Falkentyne like this. -
Yeah, exactly what I used, except I'm completely ghetto, with no good tools (except a titanium razer blade and titanium scissors, nail polish, kryonaut, conductonaut, and screwdrivers that barely fit, so I had to use something like this. Which qualifies as NSFW compared to your excellent cutout:
![[IMG]](images/storyImages/AtMMjdU.jpg)
I used nail polish to cover what exposed parts were around the CPU BGA, instead of tape. There were no obvious resistors like what you see around GPU slugs but I wasn't taking any chances.
This is what happens when Gamer+Chess player meets overclocking. Yeah. -
Hey, results are what matter. Nobody is going to be looking between the GPU and heat sink to see if it is pretty looking. Good job.
You could do exactly the same thing around the CPU for good measure.Papusan and Falkentyne like this. -
We will soon see how the Conductonaut works on my 1080 SLI setup with the foam barriers to keep it from migrating into dangerous territory. I used one drop of super glue on top of the Kapton tape on each side (4 drops per GPU) to keep the foam where I want it.
![[IMG]](images/storyImages/20170803_170443.jpg)
@Donald@HIDevolutionLast edited: Aug 3, 2017Papusan, Donald@Paladin44 and Falkentyne like this. -
OK, that turned out pretty good...
![[IMG]](images/storyImages/Heaven_Cryonaut.jpg)
@Donald@HIDevolutionDonald@Paladin44, Falkentyne and Papusan like this. -
-
Foam leaks like sieve, think of the uses for foam sponges - they hold liquid but with any pressure they will expel the liquid.
I wouldn't trust the foam to act as a dam for long, the liquid will find a path through the porous material to the outer edge perimeter... and keep going.iunlock likes this. -
@Mr. Fox @Papusan @Prema
Mighty Mr Fox, destroyer of BGA Turdbooks,
Prema God, our savior of true enthusiasts.
The great and noble Papusan
I found some interesting stuff tonight.
Since I repasted with LM, I decided to try to run Prime 95 small FFT with AVX (FMA3) instructions at 4.5 ghz with default volts to see how hot it would get.
And..........
Computer just powered off and rebooted by itself almost instantly.
YEAH BABY BRING ON THAT CANCER.
So I tried 4.2 ghz with -100mv undervolt small FFT with FMA3.
Ok ran fine.
So then I tried 4.4 ghz with default volts.
System powered off in less than 15 seconds.
Then I kept trying.
System kept powering off in less than 15 seconds...
.......................
BRING ON THAT ALMIGHTY CANCER.
So I tried going in the Bios and increasing VR current Limit, Psys Power Max, and all power limits to 999,999 (if possible). (going above 999,999 on power limit 4=soft brick, needs CMOS reset).
And....
System powered off in less than 15 seconds.
I noticed power draw from the CPU was about 91 watts before it happened.
Even had a scare where I thought I permanently bricked the system by loading defaults. MSI cancer firmware: if you have Command Rate set to 1T (which is hard to get to stick without failed Posts or even a cmos reset), and then load defaults (which will set it to 2T), the system soft bricks and you have to CMOS reset. Problem is the brick was so bad that the GPU light wouldn't even power on when the system light powered on, and instead of holding the power button down 5 seconds, it took 15 seconds to power off. Then it powered on and off again literally right away. I had to catch it at the right time to hold down the power button for 45 seconds with the power light off, to force the CMOS reset........took a few manual power on's after that but it worked.
Ok so something is making the system just shut off at 90 watts of CPU power draw. No video card load either....
I remembered (I Think I told you about this awhile ago), maxing out "PS current threshold 1" or whatever it was called in the VR current area, which defaults to 80 (20 amps), and limit 2 defaults to 20, and limit 3 defaults to 5. I remember setting it to the maximum (400? I forgot awhile ago, and you commented that you tried that and the system decided it didn't like you and powered off) and the system would just power off by itself at 4.4 ghz with absolutely no load on the system at all.
Anyway, I had the bright idea of setting PS Current Threshold1 from 80 (20 amps) to 120 (30 amps), for IA domain, System Agent and GT Unsliced.
I then set it back to 4.4 ghz and ran Prime small FFT with FMA3.
Power was 91W, and I was expecting it to shut off again. To my utter dismay, it did NOT shut off, and after 1 loop (2 minutes or so) passed of Prime, I closed Prime because of rather high temps (Mid 80's), and I was afraid of it shutting off. So I guess that worked. Not going to test that again though, but the fact that it ran for 2 minutes without shutting off this time, instead of 15 seconds, means I did something right...
Gotta take control of that cancer firmware! -
If you absolutely enjoy torture your Turd chips with tools like P95(second time). Why not rather use Aida64 setup as in my Guide? Should be more than enough for showing everyone if you have TRIPOD mess or heat problems.Last edited: Aug 4, 2017Donald@Paladin44 and Falkentyne like this.
-
AIDA didnt draw enough watts to cause system shutdown, papusan.
Also if Prime 95 had AVX and FMA3 disabled (in Undoc.txt, copying the files to local.txt), prime wouldnt draw enough watts either.
I only found when I was running OCCT, and OCCT was failing instantly (Like as soon as I pressed it). then after a few more attempts, the computer shut off by itself and then powered back on and rebooted instantly. Not even blue screen...
So I had to find out what was happening and cleanse that filth.
That's the only reason.
I dont like torturing turd chips. But I need to make sure I have enough power so when I game, if a game like Dying Light or Witcher 3 uses AVX, I won't shut down with high overclock because of cancer Bios.
It's the values PS Current Threshold 1 (not sure what PS Current Threshold 2 and 3 are for).
I had to do some google searching and found some intel document, it said "PS Current Threshold" means "Power State Current Threshold".
80=default (20 amps), but I dont know how 20 amps relates to 90 watts =system shutdown.... -
Guys careful with this. The moment LM touches anything it opens a path of flow, if that makes sense. Also if anything touches / contaminates the die, it'll cause a dry spot as LM will not stick to that area. This will cause temp issues.
Best advice: Just apply the proper amount of LM and it'll stay put. If you have to do a few test runs to gauge the right amount of LM then do so. It's well worth it and you'll become more familiar with LM while you're at it.
::iunlock::bennyg, jaime360, Falkentyne and 2 others like this. -
If you prefer seeing max limits, yeah. But run Stress FPU only and uncheck all the other boxes in Aida and same time run Heaven or check Stress Gpu in Aida64 should be more than enough for finding stability or whatever problems you have.hmscott likes this.
-
Enough of Kapton tape around Die and also outside the cpu/gpu pcb is more than enough. As pointed in my previous posts.hmscott likes this.
-
Indeed. I've tried every method during my tests back in the 6820HK days. You know if it was a hit I would have published it already.
It's not to say that it won't work, sure it can, however, your point about liquid expelling is valid due to the sponge properties.
As I've noted in my previous reply, if LM were to leak and touch the sponge, not only does it create a 'flow path / lava flow route,' the LM will absorb itself more into the sponge until it reaches near saturation.
Then from there it leaks out. I've tested this on a dead mobo on multiple runs (taking on and off the hs) with more than normal amount of LM.
To be clear for others reading this, it's not to say that it won't work. Those who are experienced like @Mr. Fox wouldn't be there overdoing the LM so for him it's more an extra insurance policy and/or a back up safety net below the main one.
More power to being safe.
::iunlock::Falkentyne, Papusan and hmscott like this.
The Official MSI GT73VR Owners and Discussions Lounge
Discussion in 'MSI Reviews & Owners' Lounges' started by -=$tR|k3r=-, Aug 16, 2016.


![[IMG]](images/storyImages/giphy.gif)
![[IMG]](images/storyImages/5bfddd388424efe3dfdec63c832c6208.jpg)