
I already "sanded", the only thing that still miss is the 0.5mm artic pads… i only got 1mm from them and is what have in my cpu/gpu...if in the first days the problem is fine, perhaps the viscosity of the thermal paste is the issue i dont know...
-
![[IMG]](images/storyImages/jfzt45.jpg)
![[IMG]](images/storyImages/2ciitub.jpg)
![[IMG]](images/storyImages/28aj0op.jpg)
![[IMG]](images/storyImages/261ox1g.jpg)
![[IMG]](images/storyImages/wtvhbk.jpg)
@Falkentyne
* gpu pic have the stock thermal pads but i dont have any issue with gpu temps, they are fine...this pics are from my last repaste.. -
What did you use as your sanding block?
did you use something good? High quality? or cheap?
You need something that will make it perfectly flat without errors.
then you need 0.5mm thermal pads (even better if you can stretch them and compress them to 0.2-0.3mm). The VRM's don't need good contact (i've put 4.9 ghz into stretched 0.5mm VRM/choke pads, and no boom).
Here is an example of a high quality block.
https://www.amazon.com/gp/product/B007R4Y8BO/ref=ox_sc_sfl_title_6?ie=UTF8&psc=1&smid=A7O51HGOUZ91S
The higher quality the block, the LESS sanding you will need to do to get a good result, because you will have less errors on your strokes")
And you can load it with compatible paper like this:
https://www.amazon.com/gp/product/B01LZ6TG05/ref=oh_aui_detailpage_o02_s00?ie=UTF8&psc=1
Of course you aren't in USA so that's on you how you would find something similar.Donald@Paladin44 and Pedro69 like this. -
That certainly looks much easier than what I had to go through lapping IHS via the "slowly drag the IHS over the insanely fine sandpaper on a glass plate" method before delidding became a thing.
Donald@Paladin44 likes this. -
Read my last reply and thank you for the pictures.
Do you notice the pattern of the spread?
The GPU looks nice and even with almost no variance. That's because the GPU heatsink is relatively flat, and there are no thermal pads on the GPU block to mess up anything either.
But look at the CPU.
Most of the paste is pushed out (which shouldn't be a problem, but would be if you were using liquid metal), but look at the pattern around the center.
You see how there is a 'ring' of paste followed by barely any?
The pattern should just be at the edge of the CPU, not in the middle.
Do you see that strange pattern?
that's because the CPU heatsink is not flat. It's convex, like the outside of eyeglasses lens.
That's why you have that type of pattern.
And with less heatsink pressure at the top because it has to attach to the VRM and chokes with more thermal pads, the top side of the CPU (facing the VRM) degrades/pumps out/dries out and you get 15C higher temps.
That's because that heatsink block (CPU copper plate and block) has been used/recycled by MSI ever since GT72s or GT80s.
*Edit* Pedro
You need a proper sanding kit.
Your heatsink should not look like a lion decided to clean its teeth on it.
Your heatsink looks very very awful. That's saying it nicely.
Buy a good sanding block like that preppin weapon sanding block I told you to get, then buy the same size sandpaper kit for it. The kit should start with 150 or 200 grit, and go up to 3000 grit.
Apply the sandpaper to the block. Start with 200 grit. Wet it with isopropyl alcohol or water.
Then you need to *REMOVE* the C-clips from the heatsink screws. Use a TINY flat head screwdriver for that. Work very slowly to "Pry" the c-clip out of the screw ring. Be careful not to lose the springs and screws. You need to do this to get proper room and pressure and not rip the sandpaper. You won't need the c-clips anymore after. Don't worry they are not important.
Once done, it's easy.
Place the block someplace face up where it won't move. Then apply the heatsink copper downwards and have even pressure on it but do NOT press downwards--only press enough to have "even" pressure on top and bottom and left and right. Then do about 20 strokes starting with 200 grit sandpaper. That should be enough. Let the *MOTION* of the back and forth movement do the sanding, NOT your hands pressing down!
Then switch to 400 grit and do 10-20 more back/forth strokes.
Then switch to 800 grit and do about 20 more strokes.
Then switch to 2000 grit and you will do a lot more strokes now. Might be 50 or more. Maybe might need 100. You will do enough strokes with 2000 until the heatsink is "smooth" but will not be shiny. Just not look roughed up and scarred.
Then finally, you switch to 3000 grit and polish it up until its nice and shiny. Doesn't have to be "Mirror". just shiny.
Then mount with 0.5mm pads and test the results.
The reason you start with only 10-20 strokes is, LESS IS MORE. Sanding removes copper, you can never add it back, so always start small. If you find that you didn't do "enough" on the low grit paper, you can always go back and do more later. Yes its annoying because you have to remove the GPU heatsink AND GPU VRM. That's annoying. On the GT73VR and GT75VR, you just unplug battery, pop the case, pop the fans and remove the CPU heatsink and repeat easily.
I would hate to have to do this on a GT75. Even if I was paid to do it.Last edited: Aug 15, 2018raz8020, Donald@Paladin44 and Pedro69 like this. -
Just to mention, last time on cpu i not used dot or X method but i put thermal paste in all the die with Gel maker Nano.
Yeah, the first thing that i noticed was that strange pattern on it, but what i should do? Sand more or just try find 0.5mm artic pads?
Not a risk sand many times the heatsink?
Edit:
I will try sand a little more, my sand paper is what the workers use on the walls of a house.Last edited: Aug 15, 2018Donald@Paladin44 likes this. -
Your sanding was very minimal (Very low) because the "L" marks on the corner of your heatsink is still there. So you barely sanded anything.
On both of my heatsinks, I sanded enough so the 'L" marks on each corner are completely gone. But you shouldn't need to do that much. Just what I said in# of strokes. I actually did more than I should, to be honest.
Just buy a good sanding block. I don't think you have one, or your heatsink would not look that bad. it looks bad.
Then buy the "long" sandpaper I mentioned that will fit on the block. They are standard size. I gave you amazon links.
Then just do what I said. It's really not hard at all. When you have proper tools, it's not hard to do. It's only hard if you don't have proper tools.
Remember to remove the C-Clips from the screws so you can remove the screws before sanding. You want to do the right job. The correct job.
I gave my suggestions above for the sanding block (Preppin weapon) and the sandpaper kit (200-3000 grit paper, each grit has 3 sheets in this group).raz8020, Donald@Paladin44 and Pedro69 like this. -
This is more what I use. Damn cheap. I'ts free I go cheapo, bruh?
Mr. Fox, Vistar Shook, raz8020 and 2 others like this. -
@Pedro69 If you don't have the problem when you just applied the thermal paste and it degrades over time because it pumps out - then try IC graphite pad, I'm very curious how it will perform in your case.
I didn't sand and didn't change vrm pads and it is already better, but maybe my heatsink isn't so bad.
Here is how it looked like with stock paste, when I opened it: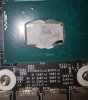
 Pedro69 likes this.
 -
![[IMG]](images/storyImages/arch2.jpg)
Anyone can confirm if this pic have the same design as one 8750H? -
I'm almost sure that that core numbering is not correct.
Pretty sure core "2" (aka core 1 in HWinfo64 or HWmonitor) is bottom left.
Otherwise on your CPU your hot cores would be "cores 0, 1, 2" and cooler cores would be "cores 3, 4, 5" shown in HWinfo64.
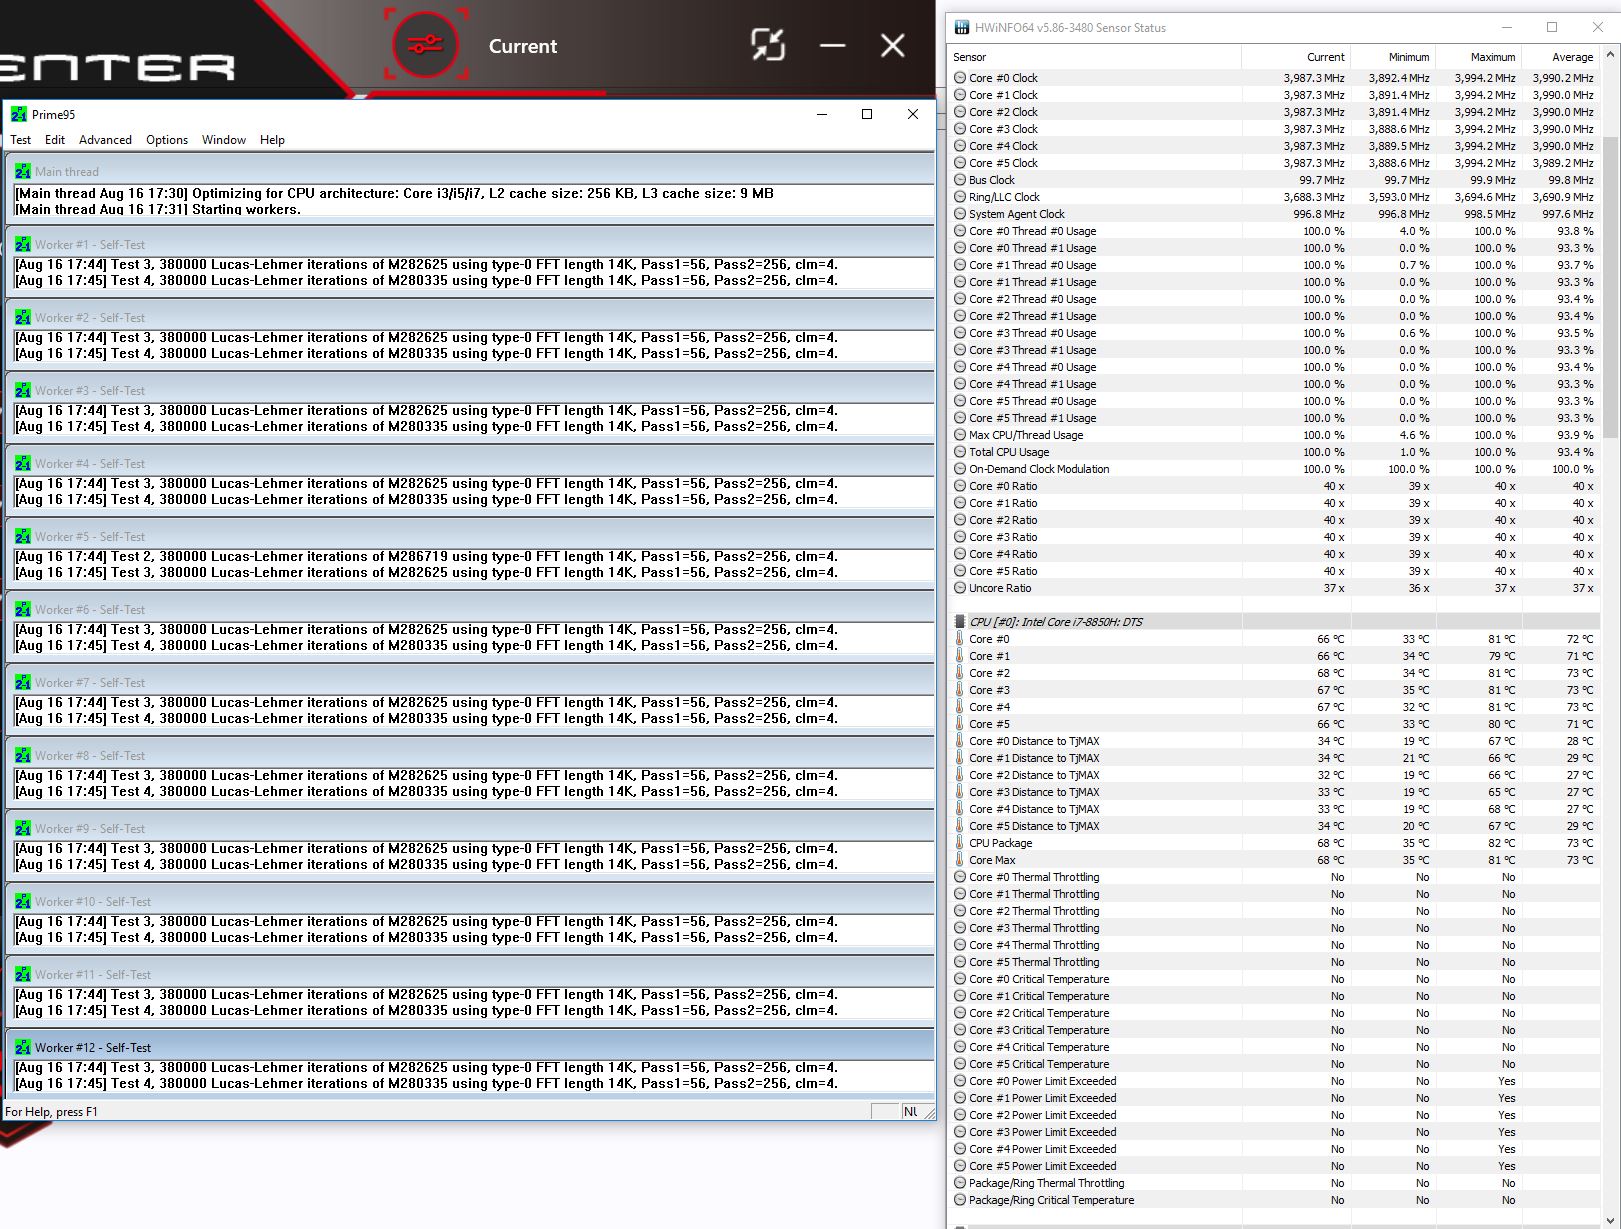
Post your HWinfo64 maximum load temps (use either 4 consecutive runs of cinebench r15, in a row, OR use Prime95 with AVX disabled (CPUSupportsAVX=0 in prime95's local.txt file in the prime95 folder), for 5 minutes). -
Well, i can confirm that my hot cores are "cores 0,2,4" and cooler cores are "cores 1,3,5"...my hot core is core 2 with 15 difference :/
-
Audio question:
I'm looking for a headphones/headset and some of them are "7.1 surround" with just two drivers. WTF is that?
Is it just headphones with crappy sound card which simulates surround and I definitely do not need that because my integrated sound card can do the same to ANY headphones? -
Pretty much proves me right.
VRM's
Chokes
--------
0 2 4
1 3 5
-------- -
Put your question there,
https://www.head-fi.org/forums/headphones-full-size.4/ -
Been lurking the last few pages and decided to run @Falkentyne 's test using Prime95. I ran 5 minutes and temps seemed to cap at 81C but I could barely hear the fans. I opened dragon center and set the fan speed to 'cooler boost' and the temps dropped like a rock to ~66C and stayed there.(while sounding like a hair drier) While I understand the physics, I had some questions about the behavior:
1) Is there a setting somewhere to kick up the fans prior to 81C? Maybe a middle ground between 81 and 66C? Is this even a concern? I am using a cooling pad under the laptop. (HAVIT HV-F2068 - great stand for this laptop)
2) Should I be concerned with power limit exceeded in the HWinfo64 window? (maybe a byproduct of the under-volt performed by HIDevolution?)
3) Is this the right clock speed for an 8850H? Specs say 4.3MHz in turbo mode but that's for one core...? It's been years since I've fooled around with overclocking my old desktop but I do enjoy tweaking my hardware and am slowly building up my knowledge on this Titan to do so.
4) I have the performance set to turbo in dragon center but do you think I could get more GPU performance with a manual overclock?
I'm thrilled with this laptop and have been using it extensively with almost no issues. I'm mainly interested in GPU overclocking. While on my desk, I'm using a 3440x1440p ultra wide as my main display and would like to get as much performance as possible. Sorry for dumb questions in advance.
Attached Files:
Vistar Shook likes this. -
-
The default fan speed curves are stored in the embedded controller.
There are three groups, first for the CPU, then for GPU#1 and (maybe or maybe not) GPU#2; it may just be GPU#1 with temps then fan speed "curves" (%) meaning both GPU's, if present in an SLI system, would run at the same speed. Can't test that.
You can see the first "Long" group I circled, although I forgot the first 64. Then there is another ascending group of values after that that I didn't circle. Then a third group. Then a fourth group.
The very first that is circled "seems" to be the CPU "temperatures" in hexadecimal format, at each step, like a curve. The second (which I didn't circle) seems to be fan speed settings. e.g. 14, 1E, 23, 37 3C 41 64. Check how many speed steps are in "MSI Silent Option", as I'm not sure if 1E is a fan speed. One of the values has to do with what 'curve' is being used. .
The fact that it goes from "41" hex to "64" hex at EC Register 77 and 78 is rather telling. I am assuming that 64 means 100% fan speed and 41 means 65% fan speed.
I guess the next group (circled) is the GPU temp steps and the fourth group (uncircled) are the GPU fan speed steps.
The settings that are stock are for basic automatic fan speed, if you have nothing installed. As you can clearly see, the fans seem to barely even start spinning until you reach 80C.
MSI Silent Option lets you set custom fan speed curves with a "temperature" slider and a fan %, but the fan % isn't calibrated for these newer laptops. I found that 90% on the MSI Silent Option slider is 5000 RPM (maximum fan speed), meaning anything above 90% makes no difference. You have to test it yourself to find out. That is on a GT73VR, so I do not know if the GT75 acts differently or has fans >5000 RPM or not.
The "Type" of curve in use seems to be stored at EC Registers F4, F5 and F6.
Last edited: Aug 16, 2018raz8020, Talamier and Vistar Shook like this. -
did i see it correct that aorus is able to support 4 memory sticks with 2666Mhz?
-
Well, i cant confirm the source but have this on my phone since months…
![[IMG]](images/storyImages/aorusspec88.png) Vistar Shook and JeanLegi like this.
Vistar Shook and JeanLegi like this. -
Well, after more than 48 hours i made a few tweaks on cpu and heatsink, til now i never get so nice temperatures like this...fans always in Auto with silent option and im playing intensive games(everything in ultra or max settings) because i always want find the perfect temperatures in gaming. Dont Forget that my laptop is always on(24 for 24) 3,9Ghz and the only thing that "sleep" is the screen.
I will left the tweaks and what i have done if the temperatures still the same.
![[IMG]](images/storyImages/34o9b8m.png)
-
-
Sand more and remove the click pieces just to extend(did myself) the spring pressure...i think that the problem was solved with last one @Falkentyne
-
The click pieces?
What are click pieces?
And how exactly did you remove them?
I am very happy with those results. The 80C is normal because the cpu fans only go past 3000 RPM at 81C. What would you get with cooler boost at 100%? I think you would be around 70....hmscott likes this. -
The c-clips don't increase or decrease pressure.
That was only on some badly engineered Clevos, where the c-clips interfered directly with the heatsink touching the IHS of the CPU on LGA systems, which was just one of the legendary horrible Clevo QA shenanigans. Just removing the c-clips on a MSI turdbook does absolutely nothing, except let you get full sanding access without the screws ripping the sandpaper to shreads. It may be possible to do spring mods like adding a miniature spring (e.g. a wimpy spring from an old reference VGA's "X-bracket") or some sort of other bizarre mod, but just removing the c-clips directly does nothing. What is preventing the screws from screwing deeper is the 'cut notch" which acts as a hard stop for any more downwards static pressure. That is the main problem. All the C-clips do is keep the screws from falling out of the heatsink.hmscott and Vistar Shook like this. -
I know this is the GT75 thread but I had to comment here following this message of yours. So, sorry for hijacking the thread original topic.
I applied now this with success on my MSI GT63 Titan 8RG (i7 8750h + GTX 1080):
- IMON SLOPE = 50
- IMON Offset = -31999
Only changed these parameters on the BIOS hidden menus. Nothing else.
On Windows side I preserved the UV at -0,145 and all stress tests so far are stable for long periods of time (hours).
with ambient temperature of 28 / 30ºC (it is hot in Portugal today, but nothing compared to the 46ºC we had 3 weekends ago), the CPU never crossed 85ºC with cooler boost enabled (I have to repaste it, I know).
Cinebench r15 score is 1188.
The CPU had TDP spikes to 44W / 45W but never crossed this (meaning 90W of real TDP).
Kudos to you @Falkentyne. If you got this information from another person, please mention him so I can thank him.
Do you have any other recommendation besides what I was able to achieve?
Cheers!raz8020, hmscott, JeanLegi and 1 other person like this. -
I found Imon offset myself (-31999); -32000 seems to revert effectively to 0, so -63999 is the same as -31999.
Imon slope I never understood as its a ratio rather than an offset, 100= 1.0x. @Vistar Shook is the one you give credit to that for.
The same trick works on the MSI cancer barebones LGA to bypass the 91W TDP restriction (which is in place due to an EC / bios bug with the EC not recognizing the chip model to allow PL1/PL2 bios overrides for a LGA CPU; if the EC doesn't recognize the Bios set "power ID" set in EC RAM register E3, it ignores the Bios Power Limit overrides and enforces CPU MSR default TDP.
IA AC Loadline and IA DC loadline both set to 1 allow you to remove your undervolt and still keep the similar temperatures and also prevents VID spiking randomly (past 0.3v) at idle and stops voltage boost spiking at full load (VID will underreport the CPU vcore if this is not done, which is the entire reason why such undervolts even work to bgin with). -
No, im saying that removed the c-clips but i increased the pressure on the all 4 springs,raz8020, hmscott and Falkentyne like this.
-
How did you manage to increase the pressure?
You had extra springs? -
I'll just be happy when these results last a whole week, of course I would never have done this with the information that got from this topic and especially from the user @Falkentyne
-
The IA AC Loadline and IA DC loadline that you are talking about are these on the screenshot below (this is the screen before the IMON changes)?
![[IMG]](images/storyImages/g2lhl10.jpg)
Many thanks once again.
EDIT: Confirmed. AC Loadline and DC Loadline set to 1.
Thanks!Last edited: Aug 21, 2018 -
There is any way to put the cpu on a low profile of GHz when is in idle even with the profile of high performance? What i mean is only want 3.9Ghz on a high demand.
* Not have anymore dragon center installed. -
I think that not have reason to left the laptop always on with 3.9Ghz even in idle, thanks for the tip.hmscott likes this.
-
You must also do the following:
1) uninstall dragon center.
2) set TDC back to disabled and TDC current limit back to 0.
Those settings shown in your screenshot cause premature throttling.
Dragon Center changes these settings for you to make your CPU throttle on purpose, and these settings are usually hidden, so the average user has no idea what's going on.
Also VR Current Limit=512 is too low. Set this to 800 after uninstalling dragon center.
if you need fan control, use the "Skylake" version of MSI Silent Option (fan speed =95% is actually 5000 RPM due to different fans used). -
please help with laptop gt75vr 7rf, tested liquid metal, the graphics works great, but the CPU is worse than before
the temperature is stable at 40C on the lower "vcore" idle, but the stock clock responds with extreme temperatures in seconds on load 100C
with fast descending back without load at 50,42,40C., "why such high load temperatures? bad application LM ?? or diodes? , earlier readings also had high temperatures, but slowly
gpu but it works absolutely stable on stress 2ghx2ghz memory max 55C it works
thanks advice
edit \..
so it was my fault., when applying the seal around, the pressure made a mix of silicone x LM, now work just as good as gpu, .CPU 4.1ghz allcore 75C "
with room temperature 30C"
Last edited: Aug 22, 2018hmscott, JNogueira, JeanLegi and 1 other person like this. -
Hello
I have a GT75 8rg
I9 8950HK
32 GB ram
GTX 1080 8GB
4K DISPLAY
Full stock
No repaste
No pannel mods
I have set my ia ac dc loadline set to 1
Vr current set to 800
My pl 1 limit is 80000
And pl 2 limit is 100000
I was getting a score of 1410 on cinebench when i had made these changes in my bios
But after some months i checked again today and to my surprise my score is 925 and stuff with max fans turned on
Does anybody know why is this happening
Please help.hmscott likes this. -
80000 power limit is 80 watts. 100000 is 100 watts.
a 8950HK uses far more.
Set PL1 and PL2 to 200000 (200W).
VR current limit is set good. Nice work.
In the same place as IA AC DC loadline"1", go to the bottom and make sure TDC enable is set to disabled and TDC current limit is set to 0.
TDC enable "may" re-enable itself due to a bug, but as long as the current limit is set to 0, you should be okay.
And make SURE you do not have Dragon Center installed or it will force a "640" limit here. -
@Falkentyne
You think that using in my gtx1080 with 0,900V max voltage and a clock of 1911Mhz is enough for recent games? I mean, should i put more overclock than this? -
I don't have a 1080 so I really don't know. Sorry.
-
I highly doubt it will be stable at 1911MHz with only 0.9V.
-
It will be stable. I run mine stable at 1860MHz with 0.9V but honestly haven't tried pushing it.
It is enough for 1080p for sure, unless you are an fps whore... if you want more performance you will have to increase the fan speed and remove the voltage limit and OC some more. -
I also recommend you check the actual temperatures. You might not have been thermal throttling in the beginning but you might be now. Paste deteriorates over time and dust tends to plug the fins of the heatsinks (you might think they are clean but often they aren't....)
-
You should try it then. 1911MHz is 4 boost bins higher than 1860MHz. Unless you've won the silicon lottery, you'll probably crash.Papusan likes this.
-
So basically i ran a aida64 stress tests and on 100% load my cpu clocks are not going above 2894 and i really don't no why
My tdc is set to 0
*** The Official MSI GT75 Owners and Discussions Lounge ***
Discussion in 'MSI Reviews & Owners' Lounges' started by Spartan@HIDevolution, Jun 23, 2017.


![[IMG]](images/storyImages/1054aaf.png)


![[IMG]](images/storyImages/mkdmw5.gif)


