
It seems I cannot install Official Nvidia drivers because I am still running stock BIOS from Eurocom. I have not used PREMAs BIOS mod as of yet because of warranty concerns. As it turns the warranty i purchased for this laptop may be no good anyway in the coming months if they run out of some other particular parts. That is the reason why i have not flashed PREMAs BIOS mod as of yet. Also I have the fear of bricking it with no easy recourse as another viable reason. The dual 980M and my 4960X should be good for the warranty period though. I am not sure how to mod the .INF files so I can use Nvidia drivers with the Panther 5 so if anyone can point me to a good tutorial I would appreciate it.
@Mr. Fox The last time I tried to use official driver it would fail but I will try them again. Thanks
-
In that case, just extract them, open NVCVI.INF in NotePad and use the "Replace All" feature to replace the 4-digit hardware ID that does not match with your hardware ID. If you are running W8 or W10 you will have to boot with Driver Signature Enforcement disabled to install modded drivers. My 980M hardware ID is PCI\VEN_10DE&DEV_13D7&SUBSYS_03761558 and I am going to guess your stock BIOS has something other than '0376' that needs to be replaced by your hardware ID. Takes about 2 minutes to do the mod. This is something every Alienware owner with aftermarket GPU upgrades has to do and it's not a big deal. Once you learn how it will be super easy.
Edit: [Quick Tips] GPU Driver INF Modding for 'Aftermarket Upgrades' -
One again Mr. Fox lays it out crystal clear.,
@DreDre ,
Flash that BIOS already!!, There is seriously (almost) zero chance of messing it up, the only real big concern is if you lose power during the flash. The flash only takes a few seconds of time once it is started in the BIOS cmd. Eurocom is really crappy at honoring their warranties and I will never purchase from them again because of this. At this point because of dwindling parts, I doubt they would do any thing except offer you a credit toward a different system, if that. -
@ CaerCadarn, why do you NEED a spare? You may be better off trying to fix what ever is wrong with your original heat-sync. Or finding a someone who could fix it for you...maybe.
Last edited: Mar 22, 2016 -
yo takaezo, with closed loop water cool mod, how do u connect the fan does it run on 5v or 12v? if its through original laptop mobo pin connector then it should be 5pin right?
-
I'm already on it! Maybe a screwmod would be sufficient. But if I mess up with my one and only heatsink, I'm screwed myself. It's not that easy for me as I am not "Daniel Düsentrieb"!
Gesendet von meinem LG-H955 mit TapatalkTakaezo likes this. -
Try one of these with Liquid Ultra on top and bottom. I had to replace my heat sink because there was almost zero contact between the heat sink and copper plate. This might be all it takes, and no mod necessary. I was prepared to do this if I could not find a new heat sink for a decent price, so I never tried it. I suspect it will work. If you can find 30mm x 30mm x 0.5mm versus 0.8mm that might be better. If it turns out to be not effective, you haven't lost much money trying.
http://www.ebay.com/itm/231683152817?_trksid=p2057872.m2749.l2649&ssPageName=STRK:MEBIDX:ITSpartan@HIDevolution likes this. -
I tend towards replacing the spring-loaded screws with regular ones or at least removing the retaining rings for a tiny bit more cycle rotation. It's not that the heatsink itself is warped or bend, it's rather that I don't get the same cycle rotations on three of the four screws (9 1/2 rotations vs. 10 1/2).
But sure, I can give it a try first!") Takaezo likes this.
Takaezo likes this. -
I actually used pressure sensitive film to confirm the problem of poor contact between the copper heat plate and CPU with my original heat sink. There is no way to make it tighter or increase pressure once the components other than the die are bottomed out. You have the phases, VRMs and other things that are holding the copper plate on the heat sink away from the CPU. My original heat sink fit was tight enough to crush all of the thermal pads to the point of almost severing them and squishing them out the side, but still just barely making direct physical contact with the CPU in a couple of spots. I think the problem is the copper heat plate doesn't reach far enough down to to create solid contact with the CPU. Unless you machine away part of the aluminum in the surrounding areas to "lower" the heat sink as an assembly and force the copper plate tighter against the CPU, I think trying to get it tighter using screw mods or spring tension could be a futile endeavor, which is the reason I considered using a copper shim. I think all you might end up accomplishing is increasing pressure on the the areas with thermal pads and still not have good contact between the CPU and copper heat plate. I hope I explained this well enough to where it makes good sense.CaerCadarn and Takaezo like this.
-
Due to the size and number of contact points the whole thing is a balancing act.
Papusan likes this. -
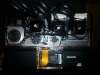
Almost done with a triple hydro cooler mod. Her is a teaser pic.Encryptonite, User32, steberg and 6 others like this. -
-
Just finishing building the wiring harness. will be adding a three port internal USB header to accommodate the three controller outputs.
Mr. Fox likes this. -
You ARE the real Daniel Düsentrieb!
Gesendet von meinem LG-H955 mit TapatalkTakaezo likes this. -
Screw carrying issues... how do I get one of these for my P370SM3? xDTakaezo likes this.
-
DIY FTW!
I am going to have to do something similar with my old CPU heat sink.
I may go with one of these http://www.ekwb.com/predator/ and use quick-disconnect fittings.
![[IMG]](images/storyImages/slider_240_1_QDC.jpg)
I like the radiator mounted pump. I would like to have 90° elbows on the water block so I can keep the bottom cover in place with no modding, just open the exhaust grilles for hoses to pass through and otherwise look stock.
![[IMG]](images/storyImages/ek-af-angled-90-nickel_800.jpg)
Will likely power it with this: http://www.amazon.com/Coolerguys-10...&redirect=true&ref_=oh_aui_detailpage_o02_s01
![[IMG]](images/storyImages/41Wg4Jh1iQL.jpg) CaerCadarn, Takaezo and D2 Ultima like this.
CaerCadarn, Takaezo and D2 Ultima like this. -
jeez, now i wont sleep well, its like that madmax fury road's "the war rig" http://vehicleshowcase.madmaxmovie.com/
-


 Ok gents and lasses, I think I should ask
@triturbo for his user name! jk
Ok gents and lasses, I think I should ask
@triturbo for his user name! jk
It works first time, straight out of the work shop (living room).
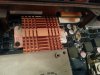
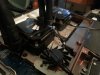
I have successfully modded my P570wm to accommodate three corsair H100i hydro-coolers, installing two additional fans over the VRM's and the north bridge respectively. I installed a 4 port USB2.0 hub inside the chassis to give a common control hub to the link software. Also I removed two of the three previous MOLEX adapters. now I have only one small MOLEX and the stock power supply/s, uniquely I rigged the MOLEX to run both 12V and 5V adapter heads from the single converter. I have seen some advertised this way. The USB hub runs out the back and around the corner as it did before.
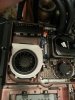
One of the newer ideas that I instituted was the use of the former heat-sink that I had already modded a couple of times. I cut it up in to a single piece that fits back where it came from, covering the Mosfet and VRM's. Furthermore I set a 12v mini CPU copper air cooler on that piece for direct cooling. seems to be working well haven't had a chance to check to many readouts yet other than temps. Everything was repasted. CLU used on all the GPU's, the CPU, and north bridge. Coolers are mounted to the GPU's heat-sinks using 24 carat IC Diamond (my fist time using this). The last unique mod was the second makeshift cooling heat-sink I created above the north-bridge. I used an old Hp 5v laptop fan and cut it to fit and customized the mount. (I did not create a shroud for it as of yet).
Seems to be running great. I will run some more test.
Full fans works great to
The wiring harness took me a full day to create and I am still using zip-ties to hold the GPU coolers and they seem to work very well.Last edited: Mar 25, 2016triturbo, CaerCadarn and Mr. Fox like this. -
if you going to go through hassle of modding, may as well go with triple fan radiator for max cooling.
-
@unityole , The coolers are hard wired with a SATA connector out (stock), for which it is connected to a MOLEX wired to run @12v. These are the ones I mentioned that I got rid of in the new mod, now loading all of them on one MOLEX connector and one single SATA out (They are in series). It works fine as long as I keep the total load under 2Amps (power rating of the MOLEX converter). Working great so far.
The cooler fans are all 12 volt so there is no option that I know of to run them directly off the board. The pumps however run off the 5v fan board pin outs (separate wire)Last edited: Mar 25, 2016ole!!! likes this. -
Then you would need some mouldable erasers to protect the motherboard, I smell the next phase of the mod
Mr. Fox likes this.
-
Might as well go for direct die phase cooling at that point
-
Not an option unless you have a few 1000 dollars laying around for repairs when it breaks....
Nope. You don't need to drop to freezing temps..... -
Condensation is a risk with any below ambient cooling, if you actually cool the air around an object due to it being colder the air cannot hold as much moisture and it will condense on that object.
-
I do have a chiller/dice pot/ln2 pots for gpus and cpu/ and a phase change unit. So that means I have a pretty good idea about condensation and what to do to combat it.
As to other users....They do not need to go to that extreme when using a water chiller. They can do perfectly fine at 18.3C degree temp water and never have to do worry about anything. They can prep the board for water leak concerns if that's the case. And using eraser by itself with condensation build up is a 100 percent way to fry your board. Water runs right off it and into places you never even thought to look. So it's a bit more prep work than that.... -
have u seen that guy puts his rig in the cola fridge? i think idle was like few degrees above 0 and under load only 10c or something.
-
this can be done with a simple mod with voltage/amp control circuit u'd find in normal laptop coolers. the fan pins for this machine have 3 i presume? just find out which one is ground, and poewr and i guess the last one is to control those value determine the speed rather have it run on full blast, have em connect to it then u can have hardware fan control, not software though ha.
maybe find a laptop cooler via usb that actually comes with a software fan control then it'll work. -
The third pin will be a sense wire, usually laptop cooler pads don't bother as since they know the fans they have two wires and vary the voltage supplied.
ole!!! likes this. -
I have full control now. Plus the use of Fn +1 for full fans on two of the internal 5v ones. The problem with using the on board three pins in that they are only 5v, and the cooling fans are 12v. So if I found 5v 120mm fans that might work. Then I could run it all off of the stock PSU's. But regardless I have control now.
Also I tried to see if the 5v pins would run the fans but they wont even start up under 5v input.ole!!! likes this. -
Using AC cooling as we do is probably still the easiest and most effective cooling method for laptops. Of course, if the hoses were long enough to reach, I suppose a guy could put the radiator directly over the AC outlet vents instead of placing the bottom of the laptop over the AC unit. That would probably work pretty sweet. You could make a shroud to go between the portable AC unit and radiator and force all of the air output through the radiator and not even use any fans on the radiator. The only downside to all of this is severely limited mobility. Hard to beat a stock laptop chassis, totally portable, sitting on top of a 10,000 BTU AC unit for benching, but ready to go anywhere, any time.
All that said, there is certainly a coolness factor (pun intended) to the AIO liquid cooling mod. Tinkering with stuff like that is always fun.Takaezo likes this. -
Well, not exactly. Although, that might help compared to no AC. I mean like the video below. Only with the air being forced through the radiator on the AIO rather than blowing on the bottom of the laptop. I am able to get down to like 12°C benching on top of the AC unit.
[parsehtml]<iframe width="640" height="360" src="https://www.youtube.com/embed/-Zn-v6ma9Jo?rel=0" frameborder="0" allowfullscreen></iframe>[/parsehtml]Should be pretty simple to build a shroud to mount the radiator over the outlet and force feed all of the cold air through the AIO radiator... like a refrigerated turbo intercooler or chilled ram air unit.
-
12c is about as cold as I can get mine. although I have seen 9 c on a very cold evening.
-
was it intel? in the past had an AC laptop cooling pad and that didn't go anywhere, it's really ashame lol, i'd be all over that mobile laptop AC, wonder how big it'd be in size.
-
sense wire for the temp?
also i took another look at the cpu heatsink, two fans, both 3 pin however heatsink itself has another connector thats 2 pin, what is that for? -
It was, here's a topic too. They hit 4GHz @50ºC, but don't mention at what load. I got my 5920G to 3.9GHz hitting 101ºC, but blowing the HWBot's wPrime 1024 world record with 16 seconds. One of these days I have to get the leaking external downsteppings in order to see how it would work with Zalman's v1 Reserator. I still think that making a self contained system is really the way to go, after all, the word laptop loses the meaning otherwise. That's why my current build would be air only and the 5920G was an experiment which hasn't seen much water since the design and execution, the air part works record breaking though
@Takaezo - Kudos for the great work! Relatively self contained and insanely awesome! A question, if you kept the left part of the stock radiator, wouldn't that help? What's the current point of the left most fan (the only stock fan) now, it seems to blow nowhere/at nothing?Takaezo likes this. -
nice share, now that i see the pic i wonder how its built. a regular cooler with TEC peltier at the bottom blowing cooler than room temp air upwards into laptop, where as heat generated by peltier goes out in the back directed by an internal heatsink within that TEC cooler.
but how would they cool the air with peltier? by having a heatsink on the cold side too? and fan blowing at it to transfer air temp into heatsink? -
[/QUOTE] @Takaezo - Kudos for the great work! Relatively self contained and insanely awesome! A question, if you kept the left part of the stock radiator, wouldn't that help? What's the current point of the left most fan (the only stock fan) now, it seems to blow nowhere/at nothing?[/QUOTE]
The single stock fan that remains is necessary because it not only keeps that ram cool, it is also the relay rpm signal (that is the third yellow wire being discussed here), to the mobo that tell the system what speed the fans are running. since that is a stock fan I ran inline jumpers in a series for the relays from CPU fan0(the one in the pic) to GPU 1&2, so that the sensors do not error out the system thinking there are no fans running for those slots. I trick the mobo into thinking that all the stock fans are running per usual. Credit to @Meaker for this solution early on. I don't have to trick CPU fan 1 because the Hp modded fan that is 5v 3 pin plugs in there
nicely and is the one that is above the north bridge.
The other part of the radiator might have helped but it was nearly impossible to kept together once I had cut it into a horseshoe shape. there was only about 1/4 inch connection between the edges and the cut. Also the angle shape of the sink in that corner, barely covers the VRM mosfet it is supposed to be covering. This is a design flaw I am sure. This also occurs at the location of those being covered closest to the north-bridge.Last edited: Mar 27, 2016triturbo likes this. -
It's a similar size fan too (the HP one) so it should run normally. I'm glad the wiring is working out.
Takaezo likes this. -
-
@Meaker@Sager I had to trim the fan down a little in order to fit it in that space but it response to full fans just the same, I am curious thou, because the H100i pumps run off the red wires per header respectively. That current is supposed to exclusively run the pumps, but when I run full fans I do not see and increase in pump speed. I suppose there must be some resistors in there preventing that from happening?
-
HeY @Mr.FOX.
I appreciate the knowledge on modding the INF files for my 980Ms. I was not sure at first but i followed your instructions to the letter. I was able to mod the inf of the 364.72 driver and ROTTR is running better now. Using the last driver Eurocom had up I was getting 32-59 FPS. Now I am getting 48-65 FPS so that was better than before. SLI is still broken on ROTTR but at least i am getting slightly better performance. Dual 980Ms should not be struggling to run ROTTR when the last game I was getting triple digit FPS with hardly any drops in double digits. Whether its NGREEDIA or the game developers someone has dropped the ball and we are not getting our moneys worth out of these cards and systems.Mr. Fox likes this. -
They want the pump not to vary so may make a constant current circuit to ignore the voltage input.Takaezo likes this.
-
@Meaker@Sager is there a separate bluetooth module device for this computer like the m18x r2? i seen some configuration of either with killer wireless-N card or intel dual band 7260 with bluetooth combo card. does this mean must get the intel wifi pcie card to get both wifi + bluetooth together?
-
The killer cards can also come with bluetooth, I believe the older models (X7200) may have come with dedicated bluetooth modules.
-
can't seem to find the driver that it comes with bluetooht, let me look for it again.
edit: nope there isn't one.Last edited: Mar 29, 2016 -
Which card do you have? The original models did not have bluetooth so you may want to upgrade it if you have an earlier one.
*** Official Clevo P570WM | P570WM3 / Sager NP9570 Owners Lounge ***
Discussion in 'Sager/Clevo Reviews & Owners' Lounges' started by jclausius, Feb 5, 2013.


![20160324_224328[1].jpg](images/storyImages/20160324_224328[1]-preview.jpg)
![20160324_213354[1].jpg](images/storyImages/20160324_213354[1]-preview.jpg)


![20160326_123633[1].jpg](images/storyImages/20160326_123633[1]-preview.jpg)

![[IMG]](images/storyImages/UbXZBWt.jpg)