
I was thinking the same and that i nred to delid it again but this is the same cpu in a desktop overclocked at 5156 ghz with a AIO coolermaster. Here all core temps are stable and core 5 is staying at 70 degree celsius. If it was a bad contact will it not show also here?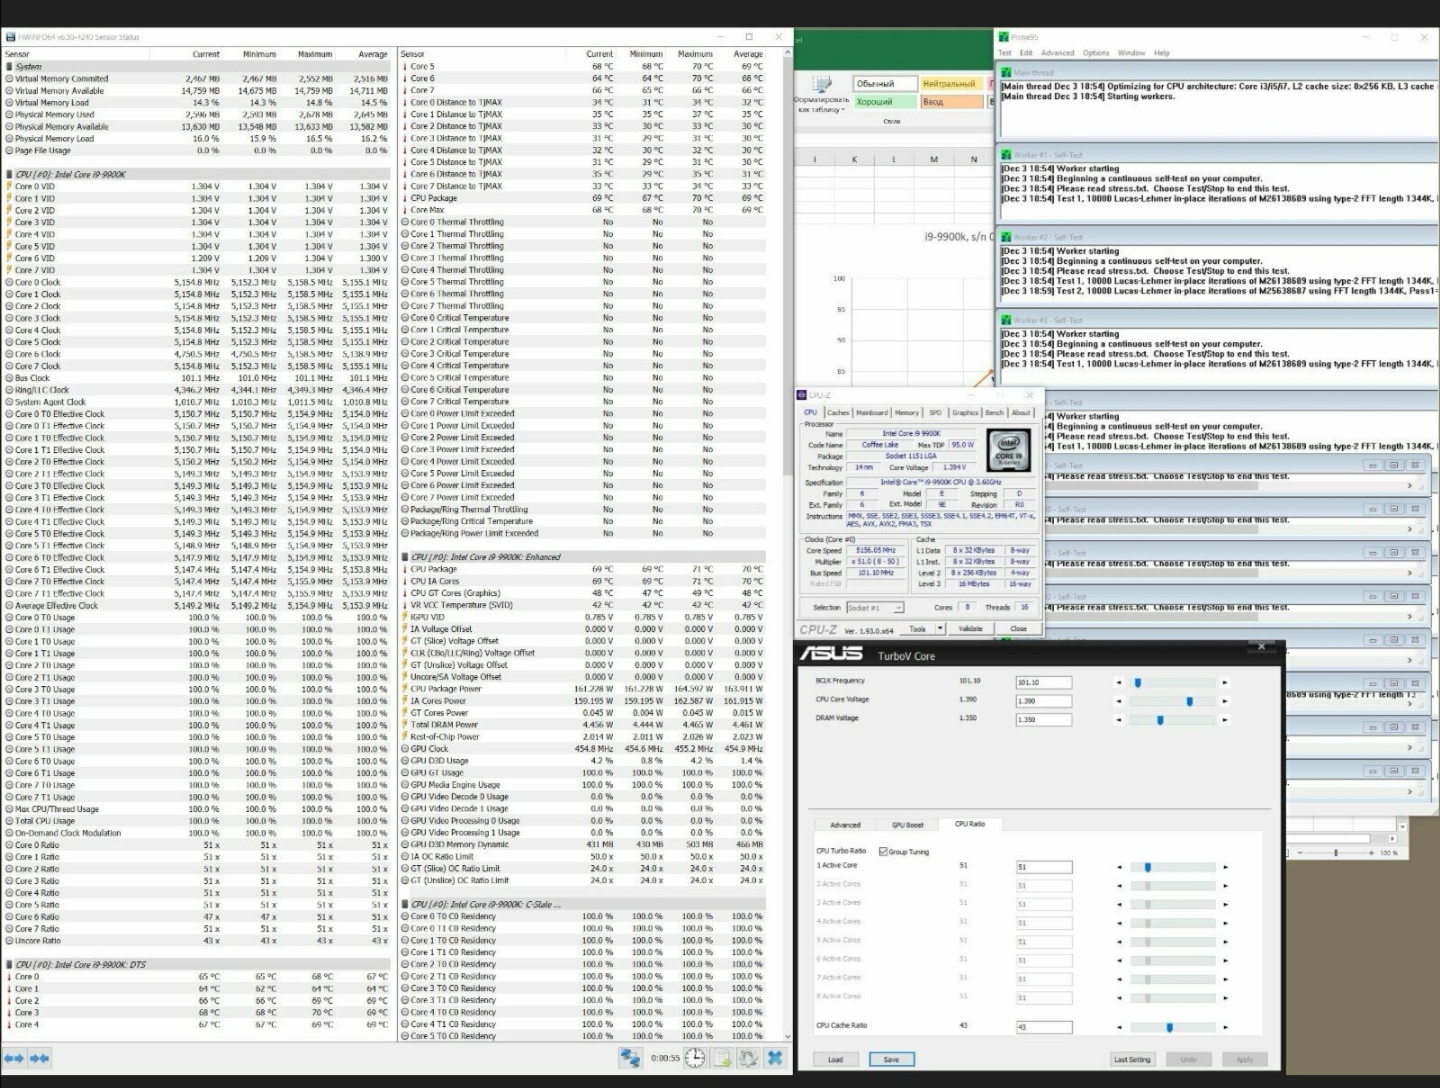
-
Hmm. Was your heatsink so concave?
This is mine after i took it off wirh phobya paste.
-
Hmmm, looks like only the top is making good contact with the heatsink, and thermal pads imprints on the VRMs are quite deep. I would reduce the thickness of the thermal pads by .5mm and that should even out the contact.
-
Indeed, you want the spread to look as close to this as possible, where nearly all of redundant paste is squeezed out by mating the two surfaces.
![[IMG]](images/storyImages/u1Ucxme.png)
- Luumis lapped IHSPapusan likes this. -
Also the IHS is usually not flat so it could be some of it too.
-
And this is from my pressure testing a few years ago
")
![[IMG]](images/storyImages/rgYdMZn.jpg)
![[IMG]](images/storyImages/i5p7m4d.jpg)
http://forum.notebookreview.com/threads/clevo-overclockers-lounge.788975/page-1306#post-10560808 -
Yes i think your right, ill put new gelid pads instead with - 0,5mm and see how the contact will be.
What's the best way to spread Phobya? I ran out of kryonaut so ill be using this one. Until now I tried to spread it on all the surface. Is this the best one or should i try do do the line or the x?
Should i increase the pressure using the toothpicks? -
I don’t have experience using Phobya, but my rule of thumb is if the paste is spreadable, I use a plastic card and spread as thin of a layer as possible evenly over the IHS. If it’s not spreadable, I do an X.
If you have the taller 4.3mm IHS, you shouldn’t need to use the toothpick mod as the heatsink already makes perfect contact based on my experience. But yours looks like the standard height BartX IHS, so toothpick mod should help.DreDre likes this. -
-
That was a test with thinnest possible layer, good way to see how bad it is.
also, people, why are all your photos so damn huge? Not like we need to see atoms in there... -
Looking for instructions to open the top cover to change the EDP cable. Is it possible to access it without removing the whole motherboard?
![[IMG]](images/storyImages/P775-TM1-G-MB.jpg)
-
No, you will need to remove the top cover to get to it.
-
Do I need to disassemble everything to access it or is there an easier way to remove the top cover? Any guides you can refer?
-
Is the screenshot from the service manual?
-
Yes, but it only shows how to disassemble and access parts like Battery, RAM, SSD, NVME, Processor, GFX, WiFi module and Keyboard.
-
Here is a video and the screws you need to remove to get the top cover off.
-
You solved my problem. Thanks a lot!
-
Happy New Year folks!
So i tried the Toothpick method on my CPU Heatsink to try and get core 5 of my 9900k under control, sadly it didnt help at all... Still getting almost 20 degree Celsius hotter as the rest and throttles in Cinebench at 4,5 ghz
From what i observed i have 3 cores that run hotter, 3 5 and 7 but only 5 is going crazy.
I also put new thermalpads witrh -0.5 mm didnt help at all.
I also tried another paste with it, Thermalright TFX also no succes, until now i tested 3 paste: phobya, kryonaut and TFX..
So i think i got really ****ty Heatsink or i need to delid the CPU again and repaste it with LM.
Whats the best method to check how bad is the contact of the heatsink?
Photos of the last application of TFX with toothpick mod, spread method was an X,
on the custom nickeld IHS i cannot spread evenly the TFX, its crazy but it does not stick at all so i used the X.
-
Pressure tape https://www.innovationcooling.com/product/ic-contact-test-analysis-kit/
https://www.amazon.com/Fujifilm-Prescale-Foot-Ultra-Low/dp/B004TLOG9M/ref=redir_mobile_desktop?ie=UTF8&keywords=pressure paper&pi=AC_SX280_SY350_FMwebp_QL65&qid=1478676646&ref_=mp_s_a_1_1&sr=8-1Spartan@HIDevolution and Cylix101 like this. -
No need for overpriced pressure film to see that contact is really bad on the bottom half of the heatsink where the paste is still clumped up and not spread out. Pressure film won't show anything anyway if the surfaces don't even make enough contact to leave an imprint on the paper. Saying this from experience. What you need is a taller IHS. The stock IHS leaves a gap of .5-1mm. With a 1mm taller IHS (I'm using the BartX) the contact is perfect assuming your heatsink is not warped.
-
Will a cooper shim help with the height problem?
How can i check if the heatsink is warped? Maybe this is the problem because if i remember right every time when i repasted and used the thoothpick mod core 3 5 and 7 are running hotter then the rest from 5 until 20 degree difference..
I also ordered a new heatsink but it all the logistics problems due to corona it will take a while till i get it
Yeah that pressure paper is impossible to find in my region.. was thinking of using carbon paper.Last edited: Jan 4, 2021 -
Don't bother with a copper shim. Will work but not as good. Get the BartX IHS.
Just use a thin cheap thermal paste to measure if the HS is warped. Apply, screw down then open up again.Spartan@HIDevolution and Cylix101 like this. -
^^^
that. also look at my photo from earlier for reference.
just apply as thin layer as physically possible, and i mean really thin, not like you do, and screw it down. -
Thx all for the answers, i just orderd 10 g of cheap thermal paste for testing the heatsink for warp problems. Should i remove the thermal pads when i will test it? So nothing interferes with the heatsink contact.
Papusan likes this. -
Try with and without, in case thermal pads are the problem.Papusan likes this.
-
Both definitely. Even though you may think the tension of the screws would compress the pads enough, you would be surprised how often thermal pads are to blame for a slightly askew pairing.Papusan likes this.
-
That's why I gave up on thermal pads. It was just too much trial-and-error and busywork trying to find the perfect thermal pad thicknesses for every single component on the GPU board that ensured good core contact. After switching to K5 Pro, my core contact is perfect and temps have never been better.
Temps and clocks after ~20 min of TS stress test with a +170/+400 OC:
 Papusan likes this.
 -
You know i was thinking the same i have a dose k5 pro lying around aswell., but is it doing a good job as the thermalpads? Is it hard to remove, i saw that is a little messy to apply.
-
It's working better than thermal pads ever did for me. Just make sure you really plop it on, as applying more than enough is better than not enough. Any excess will just get squeezed out and it's non-conductive anyway.
Papusan likes this. -
It takes an evening to do pads properly but once done it should not need doing again.
Papusan likes this. -
Keeping a schematic/drawing of the card and pad thickness for future use is also not a half bad idea.
Papusan likes this. -
So i got the cheap paste and i got to do some tests of the heatsink and it does not look good
.
First test i did with the pads on, tried to do my best to spread a thin layer overall afterwards i put the screws back and left it a little bit and then i checked the patterns of the paste...looks like it does not make kontakt at all in the middle, this are the first 2 pictures. Afterwards i removed the pads and tried again the test.
Afterwards i removed the pads and tried again the test...
And this is the heatsink, i put a straight ruler in the middile of it and a light behind to see better the curve..
Is the heatsink reparable ??
Just for backup i ordered a new one...hope that one is straight
-
Something else is going on, there should be paste with that kind of gap.
Cylix101 likes this. -
Clevo heatsink quality control strikes again.
 electrosoft, Papusan and Cylix101 like this.
 -
Most CPUs are domed so you will not get flat heatsinks usually in low pressure designs.
-
Sounds like an excuse for bad quality control...
-
What do u think it is?
I checked the IHS aswell, its flat. its a BartX one, the normal height but its extra lapped to be perfectly flat.
Any way to repair this heatsink or do some modding or just wait for the new one and hope that had better QC
-
I just noticed you pre-sprrad your paste right? Don't do that and let the heatsink do it. It will help for now.
Cylix101 likes this. -
A yes that was only for testing. I got the new kryonaut extreme and did the x spread with it, still getting thermal throttling only on one core on Cinebench at 4,5 ghz and 2 other cores are getting close to 80, the rest are chilling at 60 degree.
I put it now at 4,1 ghz and its fine in games, only two of the cores with problems are closing 75 degree, ill leave it like that until ill get the new heatsink. Will see then, if its still not working then ill need to contact BartX and order a taller IHS and delid the cpu again.
What do you think of soldering a copper shim on this broken heatsink, like MrFox did in his youtube video? Will that help with the contact? -
It would with any gap though making it flat would be the challenge.
-
Already answered here... http://forum.notebookreview.com/thr...m-owners-lounge.809621/page-383#post-11068444
-
Agreed. I was using a shim before getting the BartX IHS. The taller IHS works much better.
-
Hey, this looks even a bit better that mine was. Quality, what is quality?
No amount of thermal paste will help, no matter how expensive it is.
Some sandpaper did the trick. -
Yes, incredible how they can skimm on costs on this expensive machines..i dont think is that hard to do a flat heatisnk instead of this curved that we get
.
Lets see if the new one is better if not then taller IHS is the way. -
A shim is better than nothing at all if that poor of contact is being established, but a custom IHS with increased height will yield optimal results.
When I moved my 9900k into my P870TM1, it was an instant throttle furnace. Multiple pairing tests showed the top left corner was not sitting completely flush. I did some shim tests with ever increasing sizes till ~1mm seemed to work the best and after that the results evened out. I used a 1mm shim for awhile which greatly helped until I ordered and received a BartX 4.3mm IHS and that really dialed it in nicely especially for small to medium loads and keeping the fans at bay.
Right now, I have a much cooler running 9900ks in there that runs cool enough to get by on a shim, but I'll eventually have time and end up delidding it and moving the BartX onto it because it really does make a difference. -
It's worth delidding if you can with the taller IHS. Bit of a pain to sort it all but then you are done.
-
Ah yes, got the spare heatsink..still getting bad temps but instead of 3 cores now only on 2 ...clevo quality
..
Wrote an email to bartx and asked him if i can get a custom ihs 4,3mm for 9900k, on his website there is only one for the 8th gen. Hope he can sort me out, until then i ordered a 1 mm shim and lets see how it behave. -
Hopefully, the die heights are very different.
Cylix101 likes this. -
So now that i have two heatsinks ill try and soder a 1mm shim on the old one, should i try and lap it before? Whats the best way to lap it? because of the form its a little hard to just rub it on a flat surface and with what sandpaper size should i work?
*** Official Sager NP9175 / Clevo P775TM Owner's Lounge! ***
Discussion in 'Sager/Clevo Reviews & Owners' Lounges' started by Spartan@HIDevolution, Oct 6, 2017.


![[IMG]](images/storyImages/Qp1mpOw.jpg)

