1. Unfortunately, the separated key design means that the keyboard is the first component to go into the computer so you have to take the mainboard, etc, out in order to get at the keyboard. Even then you only get to the back of the keyboard which is somehow fixed to the keyboard surround.
2. People who have accidentally pulled a key cap off have had considerable difficulty in getting them fixed again. Given that your old other option is keyboard replacement it is worthwhile trying to carefully pull off the key caps. The challenge is to lift them off in a way that doesn't break anything, but I can't advise how to do it.
John
-
-
A brush is about the only thing that can reach the underside of the key easily without resorting to breaking the keys.
I'd try brushing the hardened coke off.
-
Regarding the disassembly topic, is there any way to do this for the no700g7c? I've gotten as far as removing the odd and the keyboard but the service manual isn't very clear... Any help would be much appreciated because I need to replace the thermal paste...
-
Hi, I really got to thank you for this guide, I also have a Samsung Chronos and this really came in handy.
I just have one question, can you tell me the function of those stickers around the CPU and GPU? -
How can i remove the optical and replace with a hdd caddy?
-
By reading this thread: http://forum.notebookreview.com/samsung/626915-hard-drive-caddy-series-7-a.html.
John -
hi,
i want to buy caddy to put my hdd in the optical drive slot.
Universal 9.5mm 2.5" SATA 2nd HDD Hard Driver Caddy For CD DVD Optical Bay+Free Shipping-in HDD Enclosure from Computer & Networking on Aliexpress.com
is this one ok with np700z5a ?
its 9.5inch
sizes are: 129x128x9.5mm -
It looks OK but I suggest you read the relevant thread http://forum.notebookreview.com/samsung/626915-hard-drive-caddy-series-7-a.html
John -
So a few weeks ago I spilled a huge cup of coffee on my keyboard. Flipped it upside down immediately and towel dried, applied compressed air, waited. The computer rebooted fine but then random keys started getting pressed onscreen. Then I started losing key functions one by one until the entire keyboard didn't work. So now I have to carry around an external keyboard everywhere
Does anyone have any suggestions on how to replace the keyboard function? Is there a special procedure to re-attach the keyboard ribbon to the mainboard?
Does anyone have the pictures & instructions to replace the keyboard and a good source to purchase a new one? -
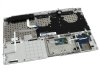
Some feedback from my disassembly attempt.
Used Phillips screwdriver #00x50mm that seemed decent fit. All nine screws around edge had a blue coloured Loctite style residue.
Take out blank SD card from card reader on front.
I removed screw from RAM cover, but left it in place as I didn't want to force it. Could slide RAM cover slightly to left, but the two retaining plastic catches inside didn't want to release. Decided caution was better option so switched attention to removing whole plastic base.
As mentioned by others I used plastic packing from USB memory sticks to help separate plastic base from metal keyboard surround. Found it easier to start above optical drive as it was easier to get initial gap open than at hinge. Due to less structural support in the plastic from the long optical opening.
Edit1: For removing the black screws holding mechanical hard drive in support bracket I used Phillips screwdriver #0x50mm. And Loctite was on one silver screw attaching hard drive bracket to motherboard, and all four black screws fixing hard drive in support bracket. So worth noting which position silver screw came from.
Edit2: Pictures showing two tabs that have a firm hold on memory cover. Which I chickened out trying to remove.

-
First of all - thank you very much for the guide!
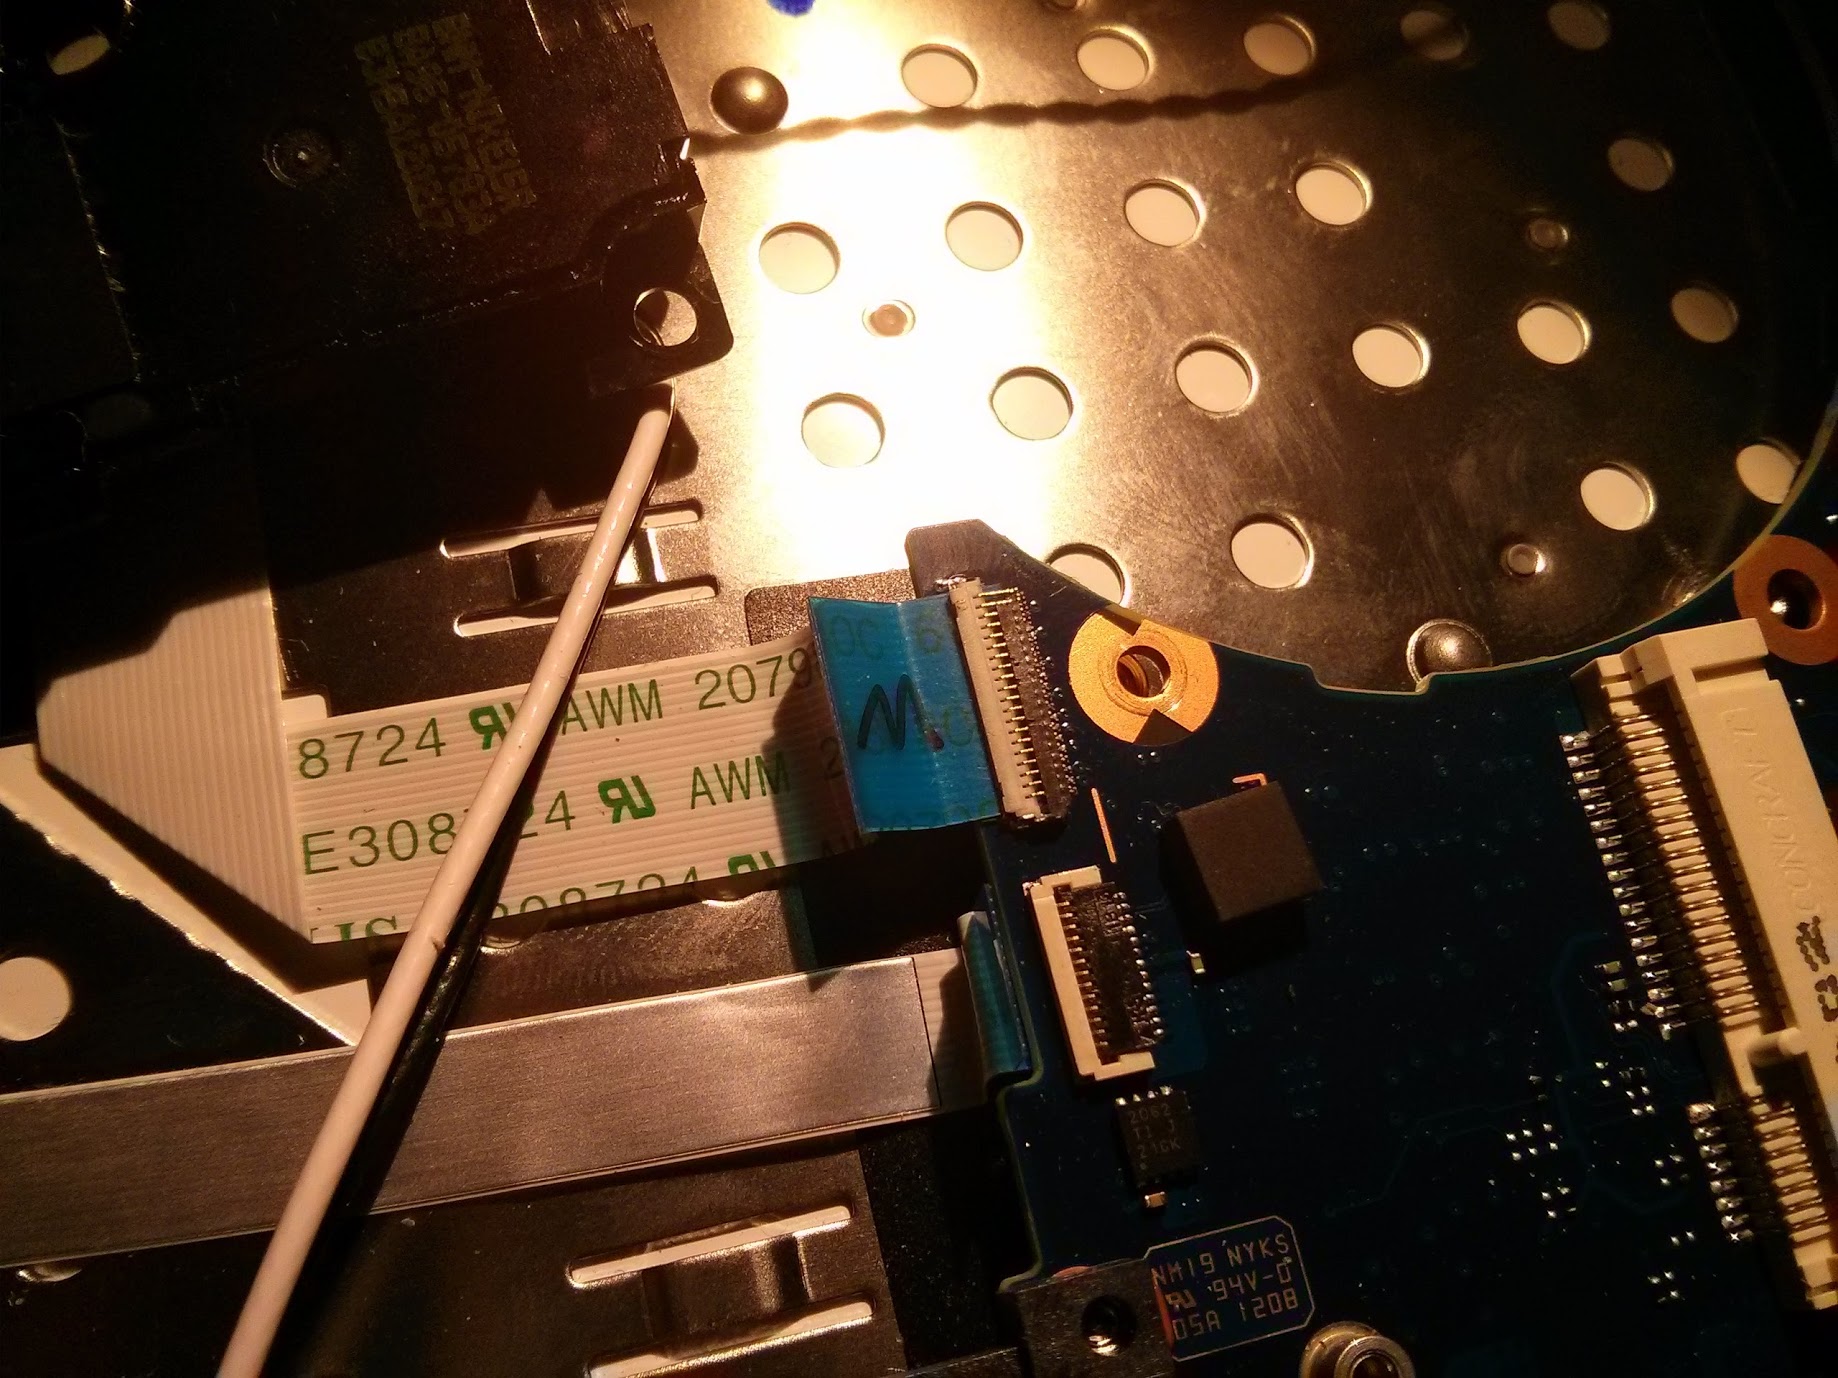
I've been trying to remove the entire motherboard, and I've run into some roadblocks I was hoping someone could help me with. I need help removing the cables seen in the following three images (to be able to remove the motherboard).
URL to pictures: imgur: the simple image sharer
Any help would be greatly appreciated")
Attached Files:
-
-
How do you remove and replace the keyboard?
I'm assuming I can replace my Canadian bilingual keyboard with a US keyboard with no problem.
I'd really appreciate it if someone who knows, could post pictures.
Thanks! -
The drawback of the separated key design is that you need to get a " Unit Housing Top" which is a combined keyboard / keyboard surround / palmrest unit. There's a good picture here.
John -
Does this make it harder to replace? Do you know how to replace the keyboard?
-
The normal procedure is to replace the complete Unit Housing Top.
Someone found a supplier in Hong Kong or China that was offering just the keyboard for one of these models but it appeared to be the component that was being supplied to the factory because there was a remark about needing specialist equipment to do the replacement.
Does your bilingual keyboard have the same number of keys as the US keyboard? If so, you could look for a place that sells the key caps. These can be changed although care is needed to not break the mechanism under the keys.
John -
I have tried to open the case on my Series 7 Chronos without much luck (although I'm careful NOT to force it at all). I've removed all the screws, I've removed the SD insert, I've tried carefully prying the plastic case off but there is enough resistance that I'm unwilling to force it. Any thoughts on what I might be doing wrong? I want to replace the 5400 rpm HDD with a 7200 rpm as I'm finding the system is too damned slow to successfully edit my HD video footage. Strange since my ancient Quad Core Win XP system with 4 megs of RAM has no problem doing it.
-
I can't offer more advice about getting the bottom off than is already given in this thread. I presume that you have a spudger / guitar pick / old credit card for unclipping the base.
On the matter of faster disk access, however, I would suggest that you consider putting one of the HDDs into the optical drive bay and then, when video processing, read from one HDD and write to the other. This will substantially increase the disk throughput compared with using one drive where both reading and writing are fighting over use of the heads.
John -
Thanks, John. I actually use a separate external hard drive for my video files but it is also 5400 rpm. Hoping to set up the new 7200 rpm drive as an external and see how that runs. If it doesn't solve the problem, I'll use a SSD instead.
-
It would be much better to put the second drive into the optical drive bay and avoid the potential limitations of the USB interface. But, if you are using USB then make sure that the drive properties are set to "Optimize for best performance".
John -
Ahoy chaps,
Thanks for the thread! After some failed boots and USB3 problems I thought some disassembly was in order. Everything went swimmingly with the taking apart, but when I was putting it back together, I managed to make rather a boob and broke the HDD connector off the motherboard on my S01UK. Is there any alternative to a new motherboard? It seems such a waste to get rid of all the components because of a 1/4" piece of plastic! Has anyone got any motherboard soldering experience? I'm used to working with valves, so when parts aren't fist-sized I get confused. Alternatively, if Samsung either can't find a board, or it's prohibitively expensive (I got the laptop second hand for £500) then will another 700Z model's board (there are some on eBay) work as a drop-in replacement?
Thanks again. -
Other Z5A boards will definitely be compatible.
You would need to do some research into whether the Z5C involved chassis changes (eg different size or changed port locations). If everything looks the same on the outside then there's a good chance that things would fit on the inside unless there are different connectors between the mainboard and any subsidiary boards.
John -
I believe Z5A and Z5C are physically identical (sizes and ports). But of course the motherboards must be quite different since one is Sandy Bridge with AMD, while the other is Ivy Bridge with Nvidia.
I would think comparing sub-boards between the two models on samsungparts.com would be a good exercise. -
Thank you both. So repair isn't an option?
On the 'Bay there are no Z5A boards, but there are some Z5C boards for £3-400, and looking at the pictures the USB positions seem the same. On that Samungparts.com, the UK versions aren't listed, but my heatsink is (BA62-00632B) and has as its supported models Z5As, Z5Bs and Z5Cs, so the processors must be in the same places.
I presume the C version is "better", with the later CPU and GPU. I'll see what Samsung offer for a new Z5A board and if it's very dear the Z5C eBay could be an option.
Dannemand: when you said "comparing sub-boards", did you mean seeing if the things like touchpad board and Wi-Fi were the same? -
I don't know which other boards are used, but you could look at components listed for Z5A on Samsungparts.com and see if they are the same part numbers as Z5C. I would compare screens and keyboard assemblies too. Anything that needs to connect on that motherboard.
-
Thanks again.
Having had a little trawl, it seems the majority of the boards for the Z5A are not the same part numbers as the Z5C, but when looking at the "supported models" in the details of each part, there are many Z5As in the Z5Cs and vice versa. Looking at some videos on the YouBend as well, it seems the board shapes are identical. So far as I can see at the moment, they look like drop-in replacements...
If I were looking for an interim solution as I've not heard from Samsung today and presumably they don't work weekends, could I take out the ODD and connect the HDD to its SATA? If it is SATA. The connectors are different, presumably something to do with the small form factor. Are converters available? Looking at the thread on here, it seems people are buying caddies - do they include jack converters or are they just holders for the drives? -
I have not tried it myself, but lots of members have indeed moved their HDD to the Optical Bay using caddies. See the following threads:
http://forum.notebookreview.com/samsung/626915-hard-drive-caddy-series-7-a.html
http://forum.notebookreview.com/sam...cal-bay-ssd-caddy-install-np700z5a-s0aus.html -
So Samsung have finally told me that they "don't sell spare parts" and I'd have to send it in to them. Not wanting to wait for weeks in order to be told I'd have to pay a good few hundred pounds, I've gone with the caddy suggestion for now. It arrived this morning, so I shall test it tonight! Now that the ODD is outside the case, has anyone got a recommendation of a SATA-USB cable I could get, with only one USB plug? I thought a nicely made DIY external caddy would offset the stupidity that caused the problem in the first place!
The other issue is that if I want to redo my Windows installation with the F4 recovery, will that format the whole disk, or just my C: partition, leaving my two other partitions intact? -
Samsung don't sell spare parts but their service agents such as Digicare do (you'll also find them on ebay UK).
There's a big range of 2.5" enclosures such as these. I've found Icy Box to be well built, but not the cheapest. Or you can use an adapter such as this. Ignore the second USB plug - all my notebooks in recent years have been able to power a 2.5" HDD from a single port.
Samsung Recovery will just overwrite the C partition. It wouldn't be very clever if it formatted the recovery partition while in the recovery process!
John -
Thanks John - I should have thought of that! My vague memory of dpart had me thinking it was on the SSD. My experience has been with DIY desktops, so laptop reserved partitions are new to me.
I'd seen a number of those caddies, but most seemed to come with external power or a rather ugly USB-Y cable. I expect there'll be something around with a single plug that I can then use to connect to a fine DIY case. Perhaps a polished wooden box!
The good news is that I haven't broken anything further, but the bad news is that after putting the HDD in the caddy, I cannot boot beyond the "Boot Menu/App Menu" screen. The HDD is recognised and labelled as the Hitachi that it is in the "SATA 2" slot in the BIOS (where slot 1 is "none" for the broken bay), but is not then available in the "Boot Menu" that appears without fail. So I can visit the BIOS to my heart's content, but never get vaguely close to Windows. Searching hasn't brought me much joy, so I must trespass on your knowledge again. Any ideas? -
It might be Expresscache causing confusion. I'm not an expert on this problem but, maybe, there are some tips in http://forum.notebookreview.com/samsung/697841-guide-how-install-windows-7-8-via-usb-np700z.html.
John -
If you made a new installation and it will not boot after setup had finished copying files, then almost certainly the problem is that of Windows Setup being confused by ExpressCache. And the solution is indeed to use one of the workarounds in the first two posts of the thread linked by John.
But if you simply moved the HDD (or SSD) to the optical bay, without performing a new installation (and that's what it sounds like to me) then I don't think ExpressCache is the issue.
Is this the original Windows installation or a new clean installation? Win7 or Win8?
Assuming it is the original installation (or another non-UEFI installation) I would say what you describe can happen if you enable UEFI (but the disk is MBR and the Windows installation is non-UEFI). This could happen either by you enabling UEFI or by a BIOS update.
One other possibility could be that you have to disable Fast Boot/Fast BIOS (again, in BIOS settings). This is what you would normally do to allow boot from USB, but maybe Fast BIOS limits booting to SATA1; that would make sense.
I suggest you load the default settings in BIOS, then make sure UEFI is disabled (and of course SATA2 is boot device and other settings you want). If it it still won't boot, try and disable Fast Boot/Fast BIOS and see if that helps.
That's all I got... -
That's a good point about Fast Boot not checking that the drive in the optical bay is bootable. That's likely to be the case since checking whether an optical drive contains a bootable disc can use a few seconds.
I would also add that tapping the F10 key a few times immediately after pressing the power button should bring up a list of bootable devices. This is useful for one-time booting from a different device but a permanent change in the boot order would need to be made in the BIOS settings (tap F2 a few times immediately after pressing the power button).
John -
Yes, I agree, that's worth a try to see if a Windows boot can be achieved. On my NP700Z3A it's actually Esc (not F10) after power on to temporarily select Boot Device. I would assume the NP700Z5A is the same (both Sandy Bridge Series 7 models).
If there is no Fast Boot/Fast BIOS in BIOS settings, you can try enabling Legacy USB Boot instead (I realize USB boot isn't what we're looking for, but try it just in case). -
Edit: Whoops - I didn't see those replies!
So, to clarify my actions:
1) Moved HDD to Optical Bay with caddy.
2) No boot, and as Windows was acting up before (the reason for getting into the HDD bay in the first place) I used a USB ISO to reinstall Windows onto my C: partition.
HDD recognised in BIOS all this time.
3) Following the thread John linked, I have no ExpressCache issues that occur there. As can be seen in the picture, there is no partition on my iSSD, the System partition on my HDD is active and Windows told me it had successfully installed.
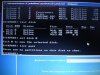
4) At a loss, as this is what I get when I boot:
Dannemand: I have no "Fast Boot/BIOS" option in my "Advanced" settings tab. The whole thing is rather lacklustre as a BIOS! -
Got it, thanks for the update. Since you DID reinstall from USB on a model with ExpressCache I would normally be quick to consider that the prime suspect. It usually causes Windows Setup to mistakenly place it's MSR (the 100MB system reserved boot partition) on that iSSD - or its boot config files if there already is a partition on the iSSD. But admittedly, your iSSD does look empty.
Is the 100MB MSR (which I presume exists on your HDD) marked Active? Otherwise do mark it so using DISKPART.
Otherwise I'm not sure what to suggest. Admittedly I don't remember any reports of users booting an HDD from the optical bay - it's always either an ODD or an HDD with the boot device on SATA1.
Edit: if marking that MSR Active doesn't fix it, I'd still use the bcdboot command described in hanime's post (op in the thread linked by John) to make sure boot files exist on the MSR. Also use bootsect /nt60 sys to write a boot sector there.
That said, the boot menu you get does seem to indicate that BIOS doesn't even find a boot device - let alone a bootable partition. -
Thanks again chaps, I'll try these when I get home and see if the process works.
To reiterate, the HDD is recognised in the BIOS as the correct Hitachi disk, just not in the boot menu, so it seems something is missing between BIOS and boot.
Yesterday I deleted the partition on the iSSD, also the C: and System 100MB on the HDD and recreated them before installation. Should I have partitioned the iSSD too? -
OK, if you had to delete a 100MB MSR (System partition) on the iSSD, then clearly you DID run into the ExpressCache issue, since that MSR should have been written on the HDD. The one you deleted on the HDD was probably the original one -- and by deleting that too, you ended up with no boot partitions at all.
When you say you re-created them, what exactly did you do?
I suggest you follow steps 6-18 in hanime's guide. You can skip step 7 if WIndows itself is already installed on its own partition. The important tasks are (1) create and format a 100MB partition to be used as MSR, (2) use bcdboot to create boot files on it (specifying the correct path to the Windows installation), (3) mark it Active.
Otherwise just try installing again, following the exact steps in her guide (although you don't have to delete all partitions as she suggests, you can leave Data and Recovery partitions).
BTW, once we're done, I think I'll move this discussion about installing with ExpressCache to hanime's thread, since it doesn't really belong in the disassembly thread. -
Poor phrasing, sorry. On my original (re)installation from the USB, following Hanime's guide, I deleted the formatted space on the iSSD, which had no 100MB partition on it, as it was untouched from when the laptop was working. I tried installing with the 7.5GB formatted (to create one large partition) and left untouched with no change in the boot behaviour.
I never got to the stage in the guide where Hanime had a 100MB partition on the iSSD - it was never created, so I had no misplaced boot files to copy. I made my Windows partition and the 100MB partition on my HDD in the optical bay, and as in the screenshot I posted earlier (after the Windows installation had rebooted) no partition had been created on the iSSD during the installation process, 100MB or otherwise, which is what made me think the ExpressCache wasn't to blame.
The only thing different from Hanime's guide is that my iSSD is "Drive 0" and my HDD is "Drive 1" in the first steps. I'm heading home now, so will try your suggestions shortly. -
OK, got it (I think).
Yes, do make sure you have a boot partition on the HDD (marked Active) and that it has the boot config files (using bcdboot). If that doesn't do it, use bootsect to make sure there is a proper boot sector. Or even bootrec with the /fixmbr option.
You never confirmed my assumption that UEFI has remained disabled throughout all this. If UEFI was enabled at any point during Windows installation (or is enabled now) that changes everything, it's a completely different set of rules that apply. See this post for some introduction to that and links to further reading. -
I just tried those and no dice I'm afraid. All the operations "completed successfully". Should I go through the files to make sure the boot files are really where they say they are? If so, how would I do that from the cmd?
I disabled UEFI the first time I got into the BIOS, before the installation, but during one of the resets it may have become re-enabled. It hasn't been enabled to my knowledge during any installation. I haven't had any GPT errors during any of this cmd stuff though. Could there be a mix up at some level that means that's what's getting it recognised in the BIOS, but not the boot manager?
Oh, and the partition I mark as "active" is always not active when I look after the next reboot. Is that because it gets removed when I boot from the USB?
Thanks for all the help so far - I feel quite mollycoddled! -
LOL - there's a comment I don't get very often
Very odd that the Active partition won't stick. The flag shouldn't get changed, even when booting another disk.
You can try BOOTSECT with the /mbr option in case the Master Boot Record somehow is messed up (virus and rootkits live there). As before, you need to specify the drive (SYS or drive-letter).
Otherwise, if you're willing to go nuclear with a DISKPART CLEAN (wipe everything) that's what I would do next. It will lose everything on the disk, including data and the Recovery partition. I normally advise owners to backup their Recoveries and avoid deleting them (somewhat out of self-interest...). But in your case it's an old SRS5 Recovery with Win7 (which you can download freely from Digital River anyway) and with old Samsung drivers (which you can get newer with SW Update anyway).
But, very importantly, make sure UEFI is disabled before proceeding with that. It will have been disabled from the factory and should not be enabled under any normal circumstances on your model. After DISPART CLEAN (with UEFI disabled) do CONVERT MBR (although it shouldn't be necessary). Then you'll know you have a clean MBR disk and can proceed to perform a clean, good old BIOS (non-UEFI) installation.
Use hanime's guide (bcdboot) to work around the ExpresCache issue (or use XCOPY as described in my guide). For the rest of the installation (assuming you can get it to boot) you can use this detailed Win7 install guide).
If that doesn't work either, I have to wonder if the broken SATA1 is somehow messing with the ability of BIOS to boot. I don't see the logic of it, but I cannot think of what else could be causing this.
Edit: One more thing to try before going nuclear: Reset BIOS settings to default, then make sure the following is set in BIOS:
Legacy USB Support=Enabled
UEFI Boot Support=Disabled
AHCI Mode control=Auto (or Enabled)
I forget if we did that already. -
Finally, I got my hands on a spare drive to test the booting issue. A Samsung SSD is now in the caddy. Windows installs fine from the USB, as normal. The system partition is flagged as "active". BIOS is normal, UEFI disabled. There is no system partition on the iSSD. Boot up with USB unplugged...and we're back to the blank "boot select" screen.
So, is there anything I could check in the cmd perhaps to see what is missing? Can I verify the boot files are in the right place?
Thanks. -
And that is normally to be expected when installing Windows from USB on models with ExpressCache. Then you have to boot Windows Setup a second time and use the bcdboot steps in hanime's guide to add boot files to the main HDD (or SSD).
Admittedly, if this really is the problem, Windows Setup would have created a system partition on the iSSD, and you said it didn't do that. So once again, it sounds like BIOS really cannot boot after you broke SATA1. Or maybe it can only boot ATAPI devices like CDs/DVDs from SATA2. -
Alas, it seems you're right. There're only a couple of MB in use on the iSSD, no partitions listed on it in diskpart and the active partition (on the caddy drive) resets itself every boot. Looks like the BIOS prevents it. So, any last ditch ideas or is it pay £500 for a new motherboard for the sake of a piece of plastic? Thank you so much for the time.
-
I am sorry we couldn't get that working. It is puzzling to me as well that you shouldn't be able to boot from SATA2. But you have indeed tried everything.
You could ask in the NP700Z5C Owners Lounge (where many installed SSDs and moved their HDDs to the optical bay) if any members successfully booted the HDD from from SATA2. Of course the NP700Z5C is a newer Ivy Bridge, so it may not be the same as your NP700Z5A.
In any case would I not spend £500 on a new NP700Z5A motherboard, that doesn't make sense with a 2 year old notebook model. Spend that money on a used NP700Z5C instead -- or towards any other notebook you like. -
A good idea - I shall post in there. I think this conversation was to be moved to a more relevant thread, like the Windows USB installation one?
I have been looking on the 'Bay and there are a few possibilities of cheap, used models that I think could be cannibalised for their motherboards, Z5Cs among them, as the exterior of mine is in excellent shape. I've only had this one for 6 months, and as I bought it used for £560 I certainly want to avoid spending as much again for a part!
I haven't seen any notebooks that come near this series for simplicity, lack of bloatware, settings software that works, high performance and excellent battery life, and I'm not in the market for Windows 8, hence why I've been wanting to resurrect this one so much!
At least a good lesson in thinking things through before "that connector must open this way" ;-) In trying to become aesthetic ascetics we don't realise what we have sacrificed of the repairable or user-understandable, so we can carry yet more 'stuff' around the place.
A costly error, but I've learned a lot from your comments and suggestions which will surely come in handy in the future. Thank you again. -
Oh that's right, I forgot that I wanted to move the Windows install discussion. But since we've now come full circle back to hardware issues, I actually think I'll leave it here after all. Otherwise I would have to cut out several posts in the middle of our discussion. Most users come to this thread when they want to swap an SSD in their notebook and move the HDD to the optical bay, and some of our discussion might be useful in that context.
And yes, I agree, these (now old) Series 7 machines are very nice. As I think I mentioned before, I like my NP700Z3A a lot (which we originally bought for my wife ). The new models (2013 Series 7 and Ativ Book 8) are great too, but they lack the two drive bays of the original Chronos models.
Good luck with your project. And please post an update when you have an outcome. -
There are also some Z5C boards which you could compare with what is in your Z5A.
I note the cheapest board has a broken HDD connector so you aren't the first to hit that problem.
John -
You make it sound like it wasn't my fault! ;-)
Yes, the Z5C boards seem to be more prevalent. However, tempting though they are, many are from the U.S. and bringing them into the E.U. is costly, which makes a "new" laptop or "parts" one in the U.K or Germany more appealing. I had contacted a motherboard repairer to see what he thought, but I haven't heard anything since.
It's a toss-up at the moment because of the risk of getting a parts one that turns out to have a duff motherboard, or a good one for rather a lot of money I can ill-afford! -
Thank you very much for this guide, I think it is very clear and helpful.
However I have a question and would be very grateful if someone knows this.
I want to remove the "unit housing top" which is the "top layer" that has the keyboard and the trackpad, to clean it, because someone spilled some coffee on my keyboard, and while fortunately the laptop works, the keys are all sticky.
The part I want to remove is actually called BA75-03459A in the samsungparts website, and it looks like the images shown below
I am wondering if, by removing the screws on the back of the laptop, this piece can be removed by pulling from the top, or I will have to look for more screws behind all the components or even the mainboard (thus requiring a total dissasembly of the laptop, which I have never tried before).
Front view:
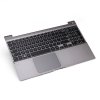
Rear view:
I have actually found a website with some apparently simple instructions on how to remove this:
Samsung BA75-03459A Keyboard|Genuine Samsung BA75-03459A Laptop Keyboards Fast Shipping
But I don't know how reliable these instructions are, nor what screws are exactly the ones "securing the palm rest" or "securing the keyboard".
I saw that some user has previously asked how to remove the keyboard, so helping me would also be useful for other users.
Thanks in advance for any advice.
Samsung Series 7 Chronos NP700Z5A Disassembly Guide
Discussion in 'Samsung' started by yknyong1, Dec 16, 2011.