
I have a modded S13 (Win7 Version, B2 panel) that I no longer want. Anyone want to take it off my hands (PM me)?
-
So I just attempted to install a B1 screen, but either it was damaged in shipping or I bent it while doing the installation. The directions given worked great, but I think i broke the screen when taking the metal clips off. How would you recommend doing this/avoid damaging the screen. T
-
I did my mod too yesterday, but no picture appeared on the screen whatsoever when I tried to start the laptop. Checked the two fuses indicated on the first page next to the display connector with a multi-meter and they seem to be fine.
Probably have no choice but to take the bezel off again and see if the old screen still works - I haven't tried the replacement screen if it works as I first disassembled the whole laptop, then the bezel.
I used the dremel to cut the PCB parts and the mounting teeth on the sides and bottom of laptop.
UPDATE:
Took off the bezel, installed the old screen, works. Installed the new one, works in Windows. Shutdown, return the bezel, no picture again. Take off the bezel with some trouble, maybe messed smth up. Now, the old screen works, the new one gives me a white distorted image when windows login screen appears (basically, a whiteish screen with some wide vertical line in the middle).
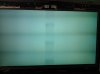
Is the screen dead now or somebody knows what problem causes such an image? Is it fixable?
I suspect it could be related to the PCB under the screen - when I cut the side pieces of it off, it lost the support so it's rather flexible now so perhaps something is losing contact there?
Any suggestions would be very appreciated (before I chuck it all to the bin or order a new one, depending on the prevailing mood at the time
JK).
(before I chuck it all to the bin or order a new one, depending on the prevailing mood at the time
JK).
UPDATE2:
Yes, the problem was the loose PCB after the bottom supports were dremeled off. I opened the PCB cover only to find that the main thin ribbon cable leading from the PCB to the screen has been broken. I don't think this is possible to repair/replace this unfortunately..
UPDATE3:
Local mobile phone service shop guy said he thinks he can fix it for the same price it would cost me to get some liquid silver for repairs and then try to pull those lines myself so here's hoping the perfectly good screen won't go to waste after all..
-
I love this mod <3 Thanks to this mod my laptop will be the best
but can someone tell me if there is ghosting in games? I'm a gamer and this is important info for me.
Cheers. -
![[IMG]](images/storyImages/30vls7q.jpg) [/IMG]hi@all
[/IMG]hi@all
first thanks for the MOD, and here we come to my Problem
i try the MOD on my SVS1313. take the B1 Display, and must also mod the bottom of the Display. but nothing more ..??
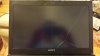
but the screen only Show a big yellow cube in the middle of the screen. Have anybody an idea ? do i Need a different Cable or had i forgott somthing.
is this the wrong Display for the svs1313 ?
Sorry for the bad english, i hope you understand anything
-
Hmm, can't really help you with the screen - if you didn't touch anything but have just connected it, perhaps it's not working properly..
So, you decided not to remove the mounting points on the sides? Which screws did you use to fix it in position and what do they screw on below the screen? -
Hi,
i read the hole thread again, and i think i need the 2channel displaycable
I found it for 37 so i will try it and give here an Update. But deveverytime is 2 weeks.
The Mountingpoints for the Display ( 2 on every side + in the mittle only a nose ) will perfectly fit with the orginal. So i can use all 4 Screws.
You will only see 2 Screws on Pictures but all 4 are on the right psition.
I only have to dremel on the bottom on both sides to fit into framework. -
Ah, riiight. You've had the 1366*768 screen model, I presume.
Hmm, so the original 1366*768 screen used in Sony non-premium comes with screws you can use to fix the B1 replacement screen? And the screen base behind the bezel comes with the mounting holes?
Then the bezel is different so I don't know how much of the screen bottom (unless you're referring to the base) you need to dremel off.. Just a word of warning - if you dremel the B1 screen supports on the sides of the PCB under the screen, take care not to bend the PCB much or the internal cable might snap (what happened to me). When I come back from the holidays in a few days, I'll see if the service guy was able to fix it.. -
So I finally was able to instill the new IPS display and it's beautiful
. My only concern now is that since I cannot see the BIOS, is there anyway for me to display it on an external monitor, etc., or will I need to pop the original LCD back in whenever I need to access the BIOS?
-
Can someone answer my question please? It is very important for me
-
Hello, fellow modders! Just replaced broken lcd with LP133WD2-SLB1 (bought via aliexpress, I can link seller if someone needs it) on VPC-SA2S9R (PCG-41212V)
Just cut bottom edgind by the mounting holes and cut screen's circuit board. Surprisingly, screen works in BIOS, may be it's because of older model than S13.
For those who wants to perform similar mod, keep lcd from dust while cutting circuit board. I,ve made 10-20 dead pixels because of it. I have some photos if someone interested, and may test for ghosting and such things, just advise me which is the better game/program to test.
Cheers -
I think it was reported that it works on external displays, but your best bet is to try it yourself, no?
-
There you go:
PRAD | Ghosting Test
and test gif:
PRAD | Testprogramme | Schlierentest
Short video to test if ghosting is there:
http://www.youtube.com/watch?v=cZabmeOhk2Q
Thanks! -
I tested my Sony display and compare results with my desktop TN Samsung monitor and Lenovo Y470 standard display, very bad TN
Sony(1600x900 IPS) Samsung(1920x1080 nice TN) Lenovo Y470(1366x768 bad TN) Flag test bw:93.6% wb:60.3% sg:71.6% wg:68.0% bw:74.3% wb:98.9% sg:60.6% wg:63.0% bw:97.3% wb:91.5% bg:75.2% wg:63.3% Transition time 22(36.7ms) 12(20.0ms) 29(48.3ms) 18(30.0ms) 11(18.3ms) 21(35.0ms) 18(30.0ms) 10(16.7ms) 20(33.3ms) Theres i can see slight difference and i could see short trace on my new IPS screen
The video looks the same at all monitors in my opinion.
I also tried TFTTEST tests with moving squares and at the lowest speeds there were evident traces! at TN monitors it was slightly noticable at maximum speeds. I'll take photos when i get camera back.
After i tried ghosting testing program you linked at Sony, it left blinking square at bottom left corner, even after I turned program off! Even reboot didnt help, there was blinking square at desktop and in other programs. It took about 5-10 minutes to disappear. I had no any camera to take a photo at the moment. So, I think this mod may cause discomfort while gaming, anyway I play sometimes and will tell you in several days how it feels. Suggest other tests to perform before I hand this laptop to my parents in several weeks.
Cheers
Update 1: Tried SC2 and found almost no ghosting, but if you look for it you can see it especially at higher speeds during replay. Also tried platformer Knytt Underground, at locations where character is much brighter than background, ghosting was similar to TFTTEST floating squares test, but anyway not significant. Keep in mind that im not hardcore gamer to judge, but for casual to average play it's not a problem at all, especially for such better picture quality anyone can notice, especially in comparison to my own lenovo y470. Photos coming as soon as i get camera back. -
I really appreciate that you spend so much time just to check it for me...
Thank you very much!
I'm waiting for photos
Cheers! -
Here are photos I could make, but they dont represent real picture, ingame photos are not useful at all, so read remarks on every picture:
Those photos are sony ips display tests made in tfttest v1.52 at speeds 10 20 and 30
![[IMG]](images/storyImages/th_sonyspeed10_zps96e97b4e.jpg)
![[IMG]](images/storyImages/th_sonyspeed104colors_zps5e4bf051.jpg)
These are horizontal slides at speed of 10. There you can see trace of previous frame, but eye sees smooth gradient one segment long.
![[IMG]](images/storyImages/th_sonyspeed20_zps1b942d9f.jpg)
![[IMG]](images/storyImages/th_sonyspeed204colors_zpsc668fd24.jpg)
Horizontal slide at 20. Trace is approximately twice as previous setting, both behind the squares and before(from black to square)
![[IMG]](images/storyImages/th_sonyspeed30_zps49c8b9e1.jpg)
![[IMG]](images/storyImages/th_sonyspeed304colors_zps02fd8ad4.jpg)
Horizontal slide at 30. Trace length is about to square size, white square at first picture is almost gray, so as black square beneath it, but solid grey.
At higher speeds white and black squares are equally grey. Here is explanation: display works at 55-60 fps (16,5-17,5ms) and camera takes about 3 frames, which is about twice latency(twice is because camera could start recording shot at the middle of the frame), 34ms+. According to panelook this lcd is up to 36 ms, which also matches to my previous tests from table.
Here are simultaneous shots at the floating square test in comparision to my lenovo y470 (AUO 14inch glare TN, gamut:45%, 8ms):
![[IMG]](images/storyImages/th_sonyvsy470speed10_1_zpsacccf9b6.jpg)
![[IMG]](images/storyImages/th_sonyvsy470speed10_2_zps367453c7.jpg)
Floating square at speed of 10. Left: lenovo, right: sony.
![[IMG]](images/storyImages/th_sonyvsy470speed20_1_zps2f26c4ae.jpg)
![[IMG]](images/storyImages/th_sonyvsy470speed20_2_zps1df9c48b.jpg)
Floating square at speed of 20. Left: lenovo, right: sony.
After one evening testing in games and tfttest, I'd say there is almost no ghosting as you may think and it's absolutely playable. If you doubt, try tfttest floating square test. Square is 30 by 30, at speed of 10 you ll get about 1/3 if a square gradient trace, at 20 - 2/3 and so on. It is white to black, the most unfavorable case. I could not notice any trace while playing(i,ve mistaken about Knytt Underground, short trace was at my lenovo too)
I have no other IPS display to compare, but my friend says there is some ghosting similar to my description on his desktop monitor and it does not make playing ucomfortable. Anyway, if you are going to play professional you need laptop made for gaming.
In a short conclusion it is very playable. -
Thank you for your work! IT is very helpful
I'm not a professional gamer, but I like to have a good equipment
Cheers. -
any ideas on how to get into bios without reinstalling old screen? plugging into external didn't work.
-
Are you able to see the desktop on your external monitor? If so, then go into display properties and set that as your default monitor (aka primary display). Now when you reboot you should see the BIOS etc. Remember to change it back when you've finished troubleshooting.
-
Did you have your laptop lid closed when trying this? And did you press the BIOS setup entry key repeatedly?
-
How come I can only see my BIOS through my external monitor via DVI? HDMI does not show the BIOS...
-
Now, my laptop display is always black, but I can see the backlight is on.
My laptop was connected to an external monitor and when I click on Screen Resolution, I see that my monitor's name and my laptop monitor's name, but it's name is now different.
My laptop Display was always called "Vaio". It had max resolution of 1600 x 900.
Now, my Display is called "Digital Flat Panel (1024x768 60hz)" that is totally different than my display...any help? I only experienced this after I used AVI. -
snip
10char -
If you get a black screen but see the back light you probably blew a fuse by not removing the battery during the dis-assembly. You can fix this by soldering over the fuse. There's a post in this forum on this procedure.
-
Guys, an update: It's been 4 months since I replaced the LCD. No problems so far, the screen is going strong, solid performance, battery performance about 90-95% compared to the factory LCD.
-
At full brightness setting or?
-
At full brightness setting or?
-
EDIT: double post
-
90%-95% relative to previous battery performance with the old LCD, e.g. for half-brightnes + wifi before was 4hrs now it's 3:30
-
Hey guys, it's been a while since I've been here, but I remembered some talks about DIP switch.
I've been able to find on the net the service manual for the non-Premium Vaio S model.
On page 3-12, there is the information regarding DIP switch.
You shouldn't have to ttouch the switch 1 and 4, since they do not relate to the screen. Only the 2 and 3 switches are.
Switch 1 is for WWAN mPCIE, and switch 4 is for Intel Anti-Theft technology.
This service manual is for any SVS131xxxxxxxxx
I've been trying like a mad man to get Intel AT to work, I think this might be it since no subscription came with my laptop, I'll have a look when I get home.
Anyway, here's the manual.
https://docs.sony.com/release/MDSM/989092601_sm.pdf -
Thanks for that service manual, GuizmoPhil
+Rep -
Thanks for the guide man!
-
Thanks a lot for this Thread!
I modded my S13 yesterday, using a SLB1 from aliexpress (allstarLCD).
Everything, including BIOS works like a charm.
I neded to cut the metal ears, and a bit of the bottom circuit board, using a dremel.
Then a removed the bottom mounting frame within the Notebook cover.
Instead of dismantling the whole device to get a few mm of cable outside,
I made a small cut at the display cover - works quite well.
It took me about one and a half hour, but is totally worth it!
But there are downsides as well:
I tried the mod before and did not remove the bottom mounting frame -
the panel will fit inside the frame, but there was to much tension on it -
after installing the frot cover the panel shattered...
So I ordered a new panel, actually two new oes - just in case
If anybode in Germany (or Europe) wants a SLB1 or the SLB2 I happen to have laying around - please contact me!prone and mistaminista like this. -
Hey guys,
I'm thinking to do the mod to my SVS13A290X, but not sure about screen model that could be compatible.
Could anybody tell me, would it work with display like that ( 13 3" LP133WD2 SLB1 SL B1 for Lenovo IdeaPad Yoga 13 IPS | eBay).
I'm also wondering about installation process for the new screen SLB1 type. First post provides instructions only for SLB2, but it says that with SLB1 it would take less efforts. What particular differences between installation of SLB2 and SLB1, may be somebody have the instruction for SLB1 installation as well? -
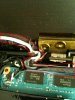
Hi, i picked LP133WD2-SLB1 for my SVS13A3AJ. It requires a lot less cutting of the Sony Bezel Back Frame support than LP133WD2-SLB2. I wanted to be able to put back the stock LCD as well.
LP133WD2-SLB1 fits almost perfectly in the Sony back bezel width and height wise (The LP133WD2-SLB2 is much wider). It`s a little heavier, thicker and not as flexible as the stock LCD screen. The LCD circuit board is a lot longer. The LCD cable connector is further to the left.
I dremeled away all the metal clips. Then shortened the LCD circuit board on the left and right sides. Then dremeled off very slowly the two remaining metal clips that were supporting the LCD circuit board. This area was really sensetive.
LP133WD2-SLB1 LCD circuit board overlaps the back bezel as well, so cut the supports with a razor. New LCD cable connector location meant i had to cut some away there too. Had to get more cable slack for the LCD cable connector.
Front bezel has two lower mid clips that had to be removed as the new LCD circuit board blocks those.
The other thing is these screen shatter very easily. I found this mod quite challenging as the screen is so delicate outside the frame!
This screen is so much better than that awrful stock LCD, was like a Acer laptop i used from 10 years ago! Thanks for this mod!
EDIT: Dremel tool is totally required to do a professional and safe cut. -
So can you guys access the BIOS or not? From my mod, I cannot access the BIOS menu except using a VGA cable connected to an external monitor.
-
I can access the BIOS on both LP133WD2-SLB1 & LP133WD2-SLB2. Other people were saying the problem was with the older S13 models. Another suggestion was updating your BIOS firmware. FYI mine is UEFI Windows 8. BIOS access via ASSIST button on startup.
-
Question for the experts:
I accidentally spilled coffee on my S13p. Dried it out, and now the (original) screen does not work. The laptop works fine with an external monitor via VGA (but not HDMI).
I took the opportunity to try out the mod. Got the B1 screen, but it just stays blank, not showing anything (again - external monitor works). It is the same behavior as the original screen.
What should I check next? I suppose the coffee spill messed up one of the parts (which is not the screen itselt), but which one? any other suggestions?
Thanks in advance! -
If you want to attempt cleaning, you should use Iso-Propyl alcohol (readily available at lab supply stores) and a toothbrush. Do not use harsher solvents like acetone. Clean off the goop slowly, carefully and patiently.
Power off and remove the battery when you do this. Do not power up and/or put the battery back until the laptop is completely dry.
When you are done, if the display is still blank you'll probably need to check the fuses on the motherboard. There are a couple of excellent threads about this in this forum. namaiki and a few others are the go to guys for this. :thumbsup: -
Finally got myself a screen... but I'm failing at the first hurdle - simply opening the laptop up...
Got exactly the same problem as this:
http://forum.notebookreview.com/sony/712391-sony-vaio-s13-need-disassembly-information.html
Keyboard section is loose at the front and sides, but something is still holding it together at the back....
Edit: Solved, I'd just missed the pair of screws on the hinge, which are covered by the hinge when the screen is open. Managed to do a test of the screen - no obvious dead pixels, a definite improvement, although not incredibly bright on max brightness...
Time to sort out the LVDS cable routing, and break out the dremel... -
Well, after about 5hrs of effort, I've got an IPS screen
Generally, it seems to have been a successful upgrade. It's got a couple of definite negatives, though
- It's not just the bios which is inaccessible, the screen is blank from a very brief flash of the Vaio logo right up until Windows booting. Could be a major problem if I need an OS reinstall, as I think I've wrecked the old screen whilst removing it (it was rather firmly taped to the bezel). Mine's an older Win7 model.
- No brightness control. I'm convinced that I had a brightness control when doing my initial tests, but after fitting it, I've not. Maybe damaged when chopping bits off the PCB... But the brightness seems about right. The white is oh-so-clean now, and black, well, it can actually display dark colours!
- The hinges will never be the same again. Turns out the the easy part of this mod was cutting bits off a fragile LCD panel... the really hard bit is the cable routing through the hinges. They must use alien technology to teleport those hinge clips into the right place or something, as they seem impossible to fit by human hands... Did the best job that I could, but I think the hinge is always going to bulge a bit on the right hand side...
- Managed a pretty clean job of the cuts, and didn't damage the bezel - but the bottom of the bezel bulges a bit - the original screen was attached to the bezel with double-sided tape, the replacement isn't, I and I think it needs it. -
Found the post way back in this thread that suggested updating the Intel HD4000 drivers to get the brightness control working again, and that's done the trick!
Just need to get some double-sided tape for the bottom of the bezel, or it'll quickly fill with dust. Seems a fairly clean job compared to some of the taped-up bezels in this thread.
Was a bit clumsy whilst cutting at the lid, though - didn't have it on a suitably protective surface and it's rather more scratched than before. But it wasn't in mint condition anyway. And the hinge cable routing isn't perfect, but seems to do the job, seems good enough to not destroy the cable when I open+close it...
I've been browsing alternative machines recently - Zenbooks and Macbook Pros... but I suspect this upgrade will extend the life of this S13 by a fair bit - the screen has been irritating me since the day I got it. And now it looks like a screen that belongs in this decade
-
My front bezel buldges a little too where the LCD circuit board is. Guess i was not the only one. Must have missed trimming a little more off the bezel frame.
The LVDS cable routing through the hinge, i think this is what you mean, works a little like "magic" trying to get it to fit like the original did. There is "just" enough space for it to route underneath the plastic clip hinge cover. You know its in properly if its "snaps" into position straight. Looking at the orignal placement, orientation and twist of the orignal cable helped a lot and it went back on the same.
-
Is there any difference between V120 cable (A1881581A) for SVS13A and V030 cable (A1841202A) for VPCSA? I'm not sure whether V120 fits into my SB, but one shop claims that according to Sony the cables are identical (but probably they just don't have V030 in stock).
-
I am also working on this stuff to swap the 1366*768 panel to 1600*900 one.
Could you provide the DIP setting for me? Since I have tried all the combination of the DIP switch and found that it didn't work.
My computer model is VPCSB18GG, and the display is changed from N133BGE to LP133WD1 (Similar model to LP133WD2).
Thanks for your attention. -
In case anybody is interested in this, I found the answer. Actually the cables have different connectors, so V030 fits SA and SB models whereas V120 fits S13.
-
Avoid ebay seller NBKIT. He sold me a damaged lcd and never refund me.
He are some pictures:

I've bought another monitor from UGOOOLE without dead pixels. -
I have Sony VAIO VPC-Y11S1E/S (13.3 screen). Before one year my screen was broken and I changed it myself with the same screen. Now i want to put an ips screen, but I have a view questions. If I understand right , I should buy a new LVDS cable because the screen resolution is higher? Should I buy a specific cable with serial number or any LVDS work ?
-
Thanks a lot Dreiser!!, I ALMOST bought tge V120 for my SB ( found a really cheap V120 for USD 25 on taobao )
-
Another successful mod reporting in
Absolutely incredible end result, the panel is bloody stunning for a laptop display. No dead pixels too!
Here's a few notes from my installation, hopefully of use to someone on the fence about this: (I've got an awful track record with miniature electronics and even I managed it!)
- Got a B1 panel from LP133WD2 SLB1 LP133WD2 SLB1 ips screen slim screen for Lenovo Yoga13-in Laptop LCD Screen from Electronics on Aliexpress.com - shipped to UK in 2 days via DHL with negligible customs fees (like £3 or something). Real LG panel, zero dead pixels or defects.
- Decided to go super lazy and/or careful in my approach and basically left out a bunch of steps that I didn't feel were strictly necessary
- Only tools used were a screwdriver, a credit card for unclipping the bezel and a hacksaw for the LCD PCB
- Didn't cut any metal whatsoever, all 8 clips/screwholes were left intact on the new panel
- Clips around the bezel are absolutely ridiculous, spent way too long gingerly removing these
- OP instructions are a bit unclear about what to do once the bezel clips are undone. I couldn't figure out how to get the bezel or panel out, so I slid a credit card under and along the bottom end of the bezel with quite a bit of force to break the adhesive. I then removed the bezel alone before removing the old panel. In the OP it sounds like both come out at once, but god only knows how that is done without shattering the old panel.
- I cut the PCB on both sides as described in the B1 guide floating somewhere in this thread, basically in a straight line a few mm from the active circuitry.
- Bent the two bottom metal clips (next to the cut PCB) on the panel slightly upwards to prevent them snagging.
- Only loosened 3-4 screws near the corner when lifting the motherboard (and wouldn't even call it lifting), didn't touch optical drive etc.
- Didn't remove LVDS cable from motherboard end
- Didn't touch any other cables in the lid such as wifi antenna, webcam etc. Not sure why other people are having to do anything with these.
- Had no great deal of difficulty rerouting the LVDS cable through the hinge after slackening it
- Removed bottom left and right and middle left and right clips from bezel (since they end up hitting the metal clips that I left on the panel)
- Bezel still clips on perfectly, didn't need any adhesive. Takes a significant amount of force to get the remaining bottom clips in, and it doesn't initially look like it is going to fit on properly.
- Bezel bulges on the bottom and sides, and opening the lid isn't super smooth (bezel snags a bit on the laptop body), no big deal though
- LVDS cables are confusing, and the amount of force required to remove it the first time had me scratching my head. It pulls out parallel to the direction the wire comes into the plug (like a ribbon cable); OP is a little unclear here.
- No display whatsoever, not even the backlight, until windows is fully booted. I'm using a windows 7 model with 8.1 installed and latest bios in UEFI boot mode. Hopefully the external monitor bios trick works if I ever want to use my optical drive again.
But yeah overall a huge success - took me about 5 hours in total.
Edit: First impressions aside, I'm going to go against the flow and say that the colour reproduction is actually noticeably worse than the Chimei Innolux (that thing wasn't sold as a 'premium' display for nothing!). Everything else about the IPS is much better (screendoor effect, contrast ratio/black level, viewing angles, text clarity). But like a worn CRT and even after significant tweaking, it simply can't reproduce the first few shades of grey - they're just black. The gamut in greens is also really bad - no amount of tweaking can stop grass etc. from looking distinctly yellow tinged. In fact gamut across the board is pretty bad - even with massively exaggerated settings, colours lack saturation. Despite the TN panel looking dull and lifeless due to its overdone matte filter and awful black level, it can put out colours that rival my £400 desktop monitor. So just some food for thought. I'm not disappointed - my initial reaction hasn't changed - but the differences are pretty clear when both displays are held side by side (I'm lucky enough to have access to an additional S13 with the original screen).
Sony Vaio S13 IPS Display Mod
Discussion in 'VAIO / Sony' started by prone, Feb 17, 2013.


![[IMG]](http://s1300.photobucket.com/user/lolspamz/media/sonyspeed10_zps96e97b4e.jpg.html)
![[IMG]](http://s1300.photobucket.com/user/lolspamz/media/sonyspeed104colors_zps5e4bf051.jpg.html)
![[IMG]](http://s1300.photobucket.com/user/lolspamz/media/sonyspeed20_zps1b942d9f.jpg.html)
![[IMG]](http://s1300.photobucket.com/user/lolspamz/media/sonyspeed204colors_zpsc668fd24.jpg.html)
![[IMG]](http://s1300.photobucket.com/user/lolspamz/media/sonyspeed30_zps49c8b9e1.jpg.html)
![[IMG]](http://s1300.photobucket.com/user/lolspamz/media/sonyspeed304colors_zps02fd8ad4.jpg.html)
![[IMG]](http://s1300.photobucket.com/user/lolspamz/media/sonyvsy470speed10_1_zpsacccf9b6.jpg.html)
![[IMG]](http://s1300.photobucket.com/user/lolspamz/media/sonyvsy470speed10_2_zps367453c7.jpg.html)
![[IMG]](http://s1300.photobucket.com/user/lolspamz/media/sonyvsy470speed20_1_zps2f26c4ae.jpg.html)
![[IMG]](http://s1300.photobucket.com/user/lolspamz/media/sonyvsy470speed20_2_zps1df9c48b.jpg.html)


